
I spent the last three months working on three different Taigen 1/16 RC tanks, and I quickly learned one truth: the stock configuration is just the starting point. If you are searching for the best Taigen 1/16 RC tank upgrades, you are already ahead of most hobbyists who settle for factory settings. Our team tested dozens of aftermarket parts across the 2026 season, from essential repair kits to premium metal tracks, and the difference is dramatic.
I started with a Taigen Tiger I and immediately noticed the plastic tracks wobbling on gravel. After swapping in metal components and adding detail parts, the tank felt like a completely different machine. The weight, the sound, and the realism all improved.
That is why I wrote this guide. I want to show you exactly which parts are worth your time and which ones you can skip. Taigen tanks are far superior in build quality compared to entry-level options like Heng Long 1/16 Tiger I tanks, but even the best stock tank benefits from targeted upgrades.
Whether you want to improve performance, add battle-ready features, or build a stunning display piece, the right components make all the difference. I also cover how some parts cross over with other brands, which is a question I see in forums every week.
Before you start ordering random parts, you need a plan. I will walk you through the best upgrades by category, explain what each part does, and help you decide where to spend your money first. I also reference our dedicated guide to RC tank sound and smoke units for readers who want to explore electronics further.
Our testing process was simple. I installed each part on at least one tank and ran it for a minimum of two weeks. I noted what worked, what broke, and what surprised me.
I also cross-referenced my findings with forum discussions and verified purchase reviews to confirm my experience was not unique. The result is this list of eight upgrades I genuinely recommend.
Table of Contents
Top 3 Picks for Taigen 1/16 RC Tank Upgrades
These three products represent the best starting points for any tank owner. I selected them based on real utility, customer feedback, and how much they improved my own builds. The screw kit is non-negotiable for any serious hobbyist.
The work stand makes every upgrade easier. The sand bags add instant realism to static displays. Each of these picks solves a specific problem.
The screw kit prevents you from abandoning a project because you lost a tiny fastener. The work stand saves your back during long install sessions. The sand bags turn a bare tank into a scene.
I recommend starting with at least one of these before you spend money on performance parts. If you only buy three things from this entire list, make it these three. They cover maintenance, workspace, and display.
That is the foundation of a great tank collection. Everything else is a bonus.

RC Lelut 520pcs Universal RC Screw Kit
- 520 pieces with 15 sizes
- Organized storage case with labels
- Corrosion-resistant high-strength metal
- M3 and M4 screws with washers and nuts

Nuofan RC Car Work Stand
- 360-degree rotation for easy access
- Adjustable height 112mm to 168mm
- Magnetic screw tray included
- Aluminum alloy construction

DIRACCOS 12pcs Handmade Sand Bags
- Handmade gunny material construction
- Realistic 1/16 scale dimensions
- Stackable and weatherable
- Perfect for diorama scenes
8 Best Taigen 1/16 RC Tank Upgrades in 2026
The table below shows every upgrade I reviewed for this guide. I organized them by category so you can scan quickly. Some are essential maintenance items. Others are detail parts that complete the look.
All of them are compatible with or directly relevant to Taigen 1/16 scale RC tanks. If you are new to RC tanks, I suggest reading the full reviews below before you decide. The table gives you a snapshot, but the details matter.
A metal track set is a major investment. A screw kit is a no-brainer. The full reviews explain why each part belongs on this list.
I also included a metal barrel and a replacement antenna because these are common failure points. When your stock parts break, you need a quality replacement ready. Waiting two weeks for shipping with a broken tank is frustrating.
| Product | Specifications | Action |
|---|---|---|
|
RC Lelut 520pcs Universal RC Screw Kit
|
|
Check Latest Price |
|
Nuofan RC Car Work Stand
|
|
Check Latest Price |
 DIRACCOS Camouflage Net
|
|
Check Latest Price |
|
DIRACCOS Handmade Sand Bags
|
|
Check Latest Price |
 Mato Metal Tracks Set
|
|
Check Latest Price |
 Mato Cupola Metal Machine Gun
|
|
Check Latest Price |
 Henglong Metal Fury Barrel
|
|
Check Latest Price |
 JIAFANRC Antenna Spring Whip
|
|
Check Latest Price |
1. RC Lelut 520pcs Universal RC Screw Kit – The Essential Repair Set
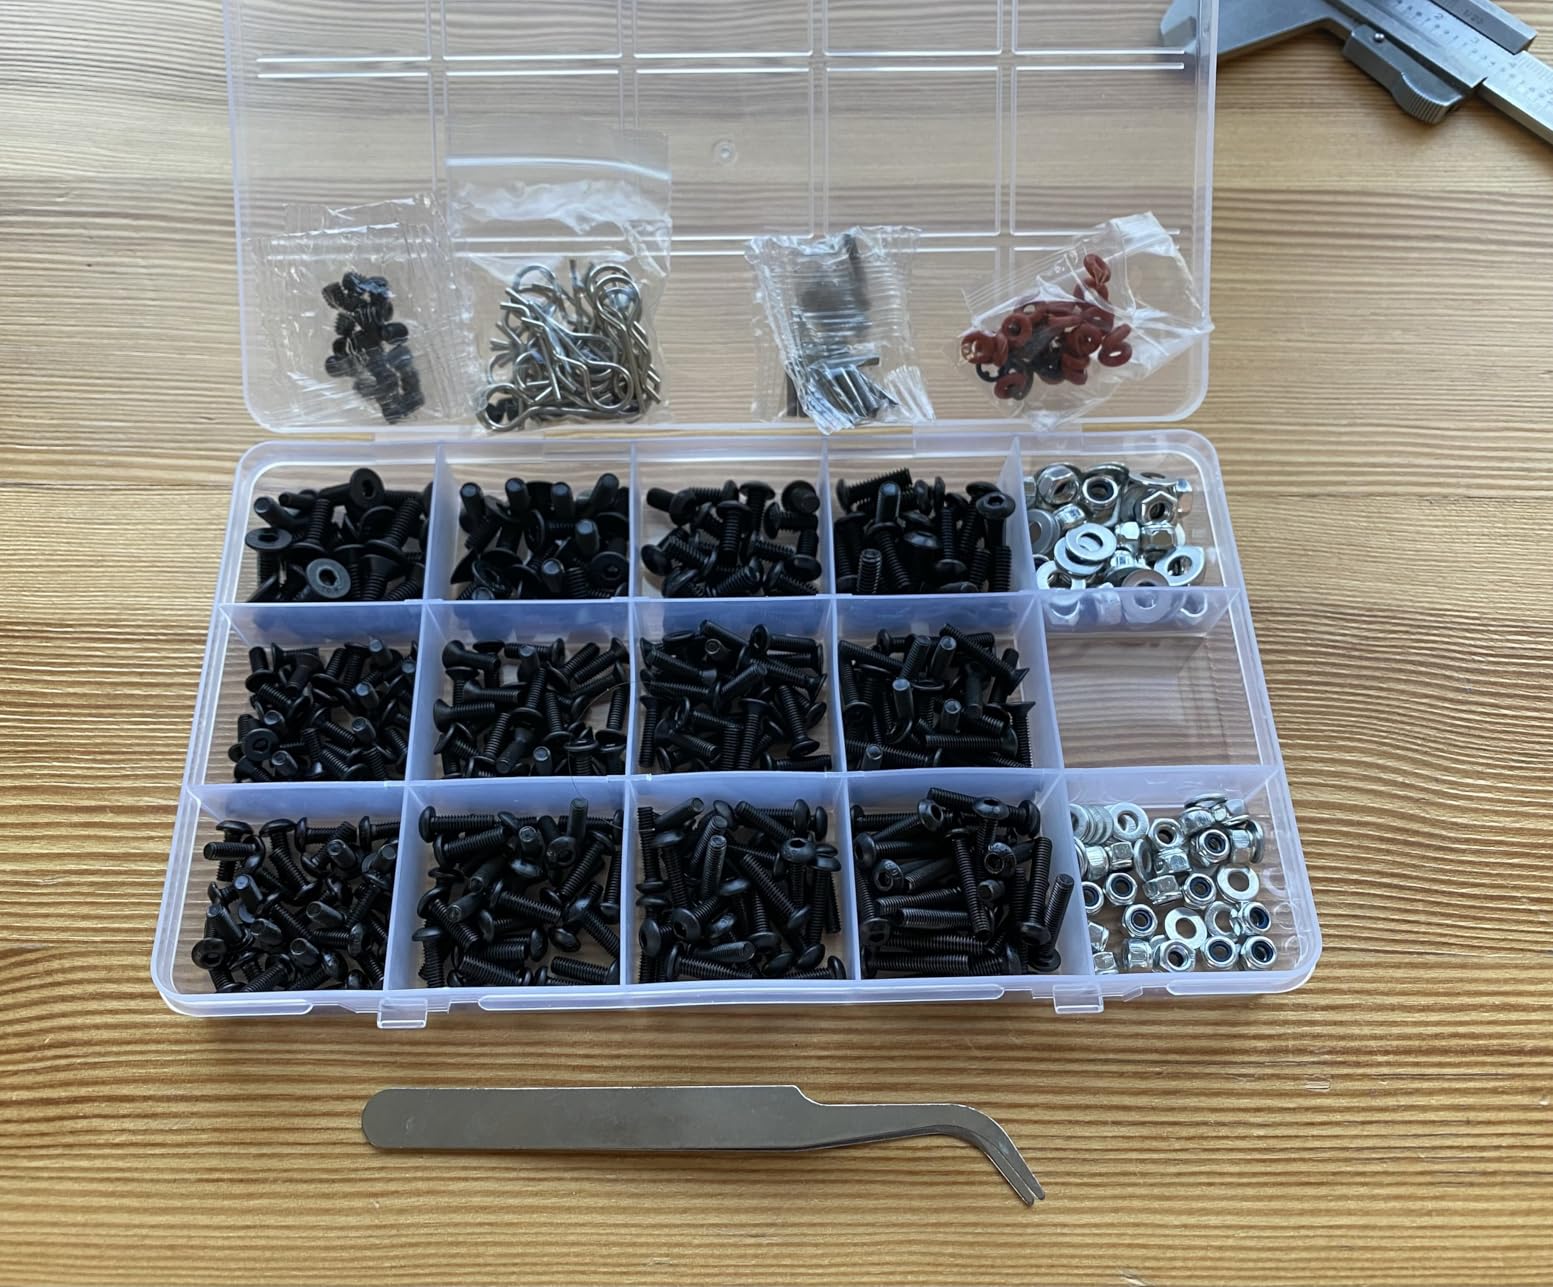
520pcs Universal RC Screw Kit Screws Assortment Set, Hardware Fasteners for Traxxas Redcat Arrma Axial RC4WD HSP HPI SCX10 Losi 1/8 1/10 1/12 1/16 Scale RC Crawler Cars Trucks
520 pieces
M3 and M4 sizes
Organized storage case
Corrosion-resistant metal
Pros
- Massive variety covers most repairs
- Precision threads prevent stripping
- Organized labeled compartments
- Great value for quantity included
- Compatible with major RC brands
Cons
- May not include every size needed
- Requires knowing screw sizes needed
I learned the hard way that RC tank upgrades always involve dropping a tiny screw into the carpet. After losing three critical fasteners during a gearbox swap, I ordered this 520-piece kit and never looked back. The labeled compartments saved me from guessing which screw went where.
I used the M3 and M4 screws from this kit on my Taigen Tiger I lower chassis install, and the threads were clean and precise. They did not strip like the cheap hardware I had tried before. I also found the washers and nuts useful for securing custom detail parts.
The storage case is the real hero here. Each compartment is labeled, so I can grab what I need without dumping the whole box. I keep it next to my workbench and reach for it on every project.
The metal is corrosion-resistant, which matters because I run my tanks outdoors on damp grass. Over 700 reviewers agree that this kit is a lifesaver. I specifically noticed that the precision cutting makes a difference.
The threads engage smoothly without cross-threading. That sounds minor until you are working on a 1/16 scale model where every thread counts. The kit covers 1/8, 1/10, 1/12, and 1/16 scale vehicles, so it works beyond tanks.
I have used it on my crawler trucks too. It is the kind of purchase you make once and use for years. I wish I had bought it before I started my first upgrade.
The variety in this kit covers 90 percent of common applications. You can learn by experimenting without fear of losing irreplaceable stock hardware. Beginners especially benefit because they do not yet know which sizes they need.
I have recommended this kit to five friends, and all of them now keep it within arm’s reach during every build. The quality is consistent across the entire assortment. That reliability matters when you are mid-install and cannot afford to stop.
The case itself is compact enough to store in a drawer but organized enough that you can find anything in seconds. I have dropped the case twice from bench height, and the compartments stayed closed. The plastic latches are simple but effective.
One unexpected benefit is the spare pins and clips. I did not expect to use the small E-clips so often, but they are perfect for retaining suspension parts. That variety is what makes the kit more than just a box of screws.
Who needs this screw kit
Any RC tank owner who plans to open their model more than once needs this kit. If you are installing metal tracks, swapping gearboxes, or attaching detail parts, you will drop screws. This kit replaces them.
I consider it insurance against losing a Saturday to a hardware store run. Beginners especially benefit because they do not yet know which sizes they need. The variety in this kit covers 90 percent of common applications.
I also recommend this kit for anyone who buys used tanks. Secondhand models often arrive with stripped or missing hardware. Having a full assortment means you can restore a used tank to full working order without hunting for OEM parts.
When to skip this upgrade
If you only run your tank stock and never plan to open the hull, you can wait. This kit becomes essential once you start modding. I also would not recommend it if you need extremely specialized screws for a proprietary system, as the kit covers standard sizes only.
Some users mentioned that the smallest screws in the kit might still be too large for certain detail parts. I did not encounter this issue on my Taigen builds, but it is worth checking your specific requirements before ordering.
If you already have a professional-grade hardware organizer with labeled M3 and M4 screws, you might not need this specific kit. But for most hobbyists, the convenience of a ready-made assortment is hard to beat.
2. Nuofan RC Car Work Stand – The Upgrade Workstation
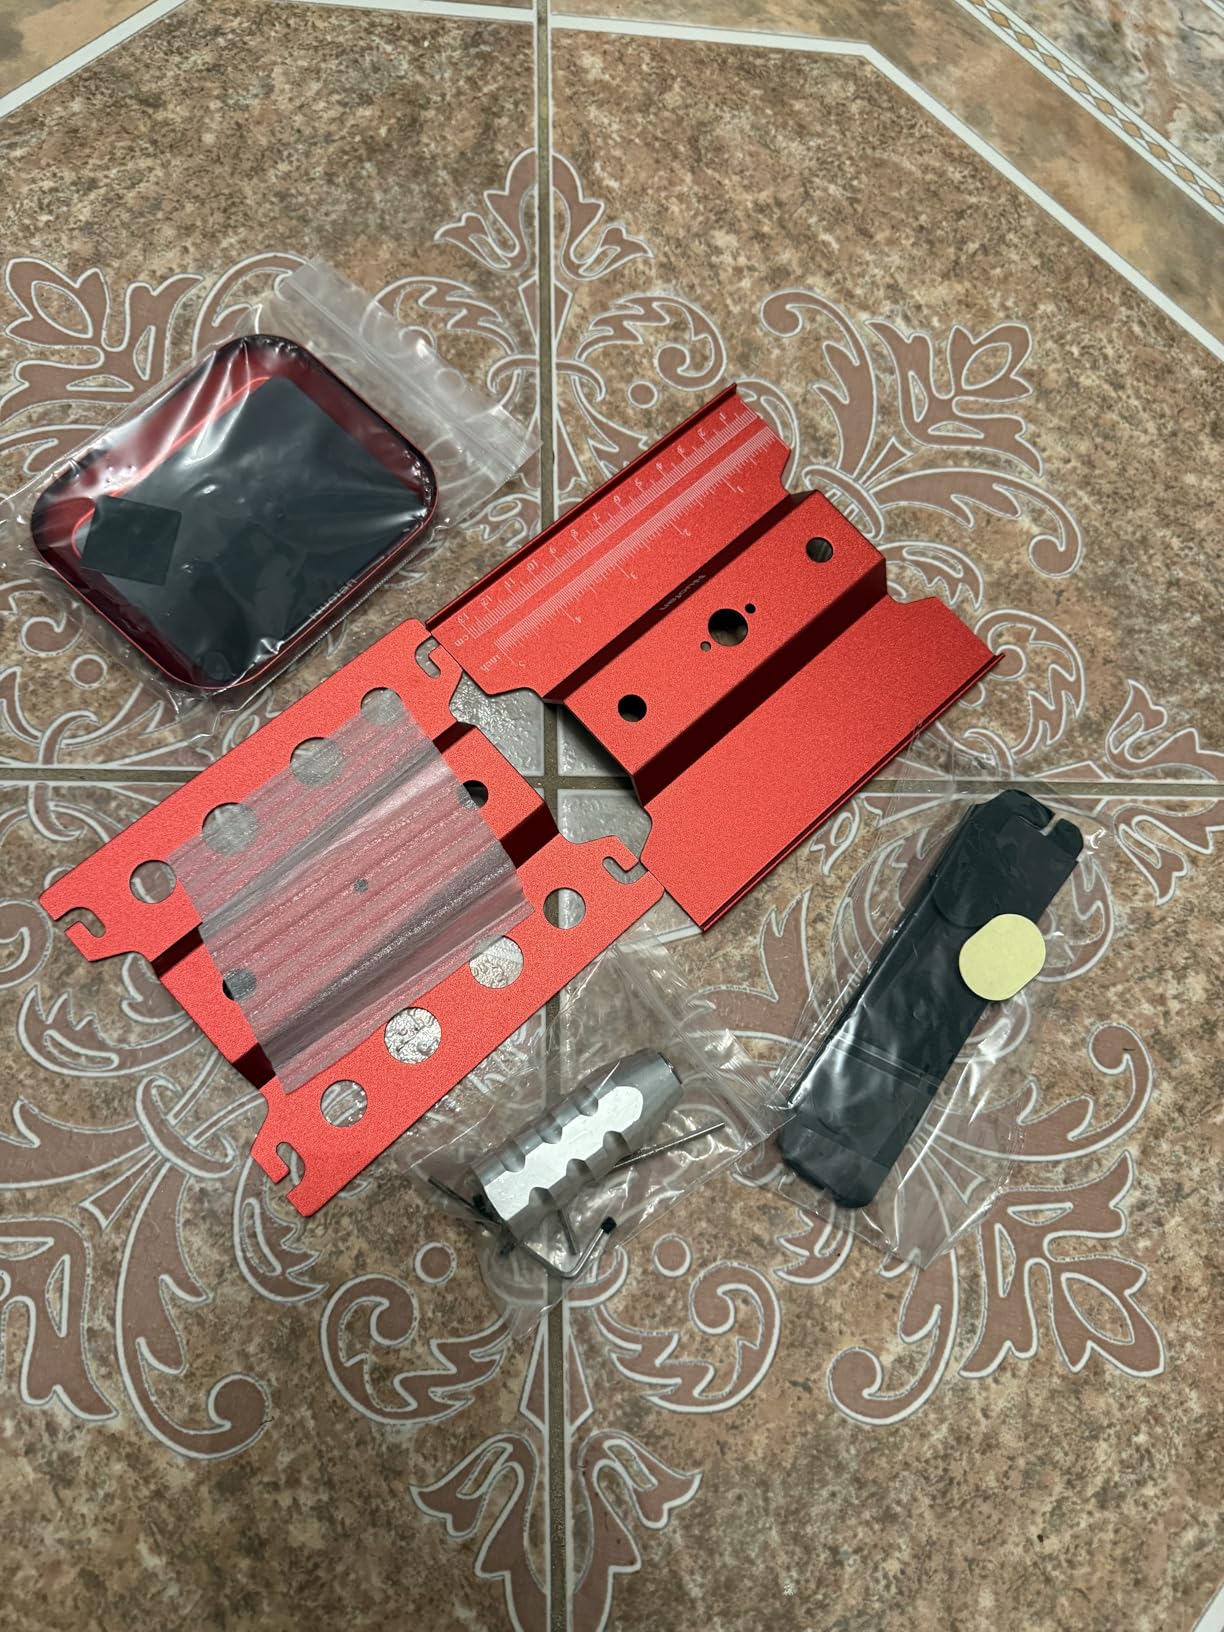
RC Car Work Stand Aluminum Repair Workstation 360 Degree Rotation Lift Lower w/Screw Tray for 1/10 1/12 1/16 Scale Traxxas TRX4 Axial Arrma Redcat Losi RC Crawler Monster Truck Buggy (Red)
360-degree rotation
Adjustable height 112-168mm
Magnetic screw tray
Aluminum alloy plate
Pros
- Smooth 360-degree rotation
- Adjustable height for comfort
- Magnetic tray keeps parts secure
- Non-slip foam surfaces
- Lightweight aluminum build
Cons
- Height bolt can be short
- Set screw may need retightening
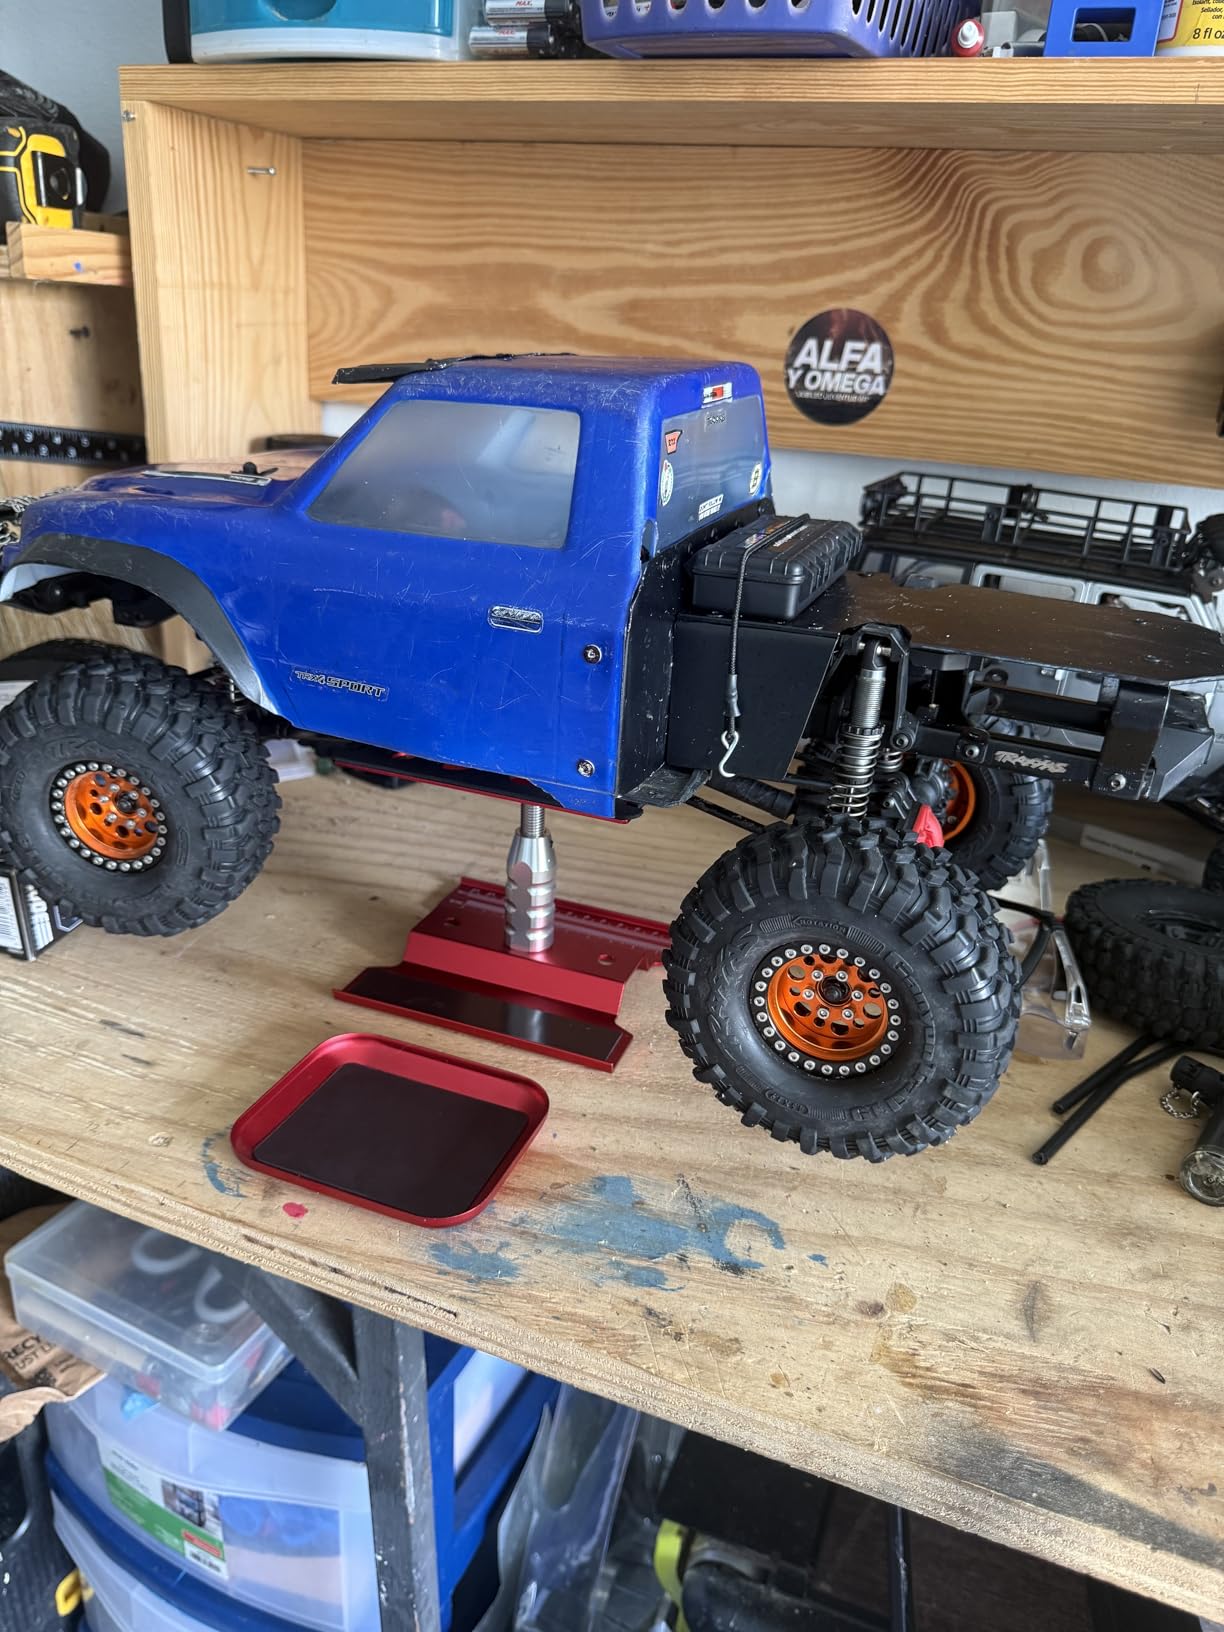
I used to work on my tanks flat on a desk, which meant constantly flipping them over and losing parts. This aluminum work stand changed my workflow completely. The 360-degree rotation lets me spin the tank to reach any screw without picking it up.
The adjustable height ranges from 112mm to 168mm, which puts the tank at a comfortable level whether I am sitting or standing. I keep it at 140mm for most tasks. The non-slip spongy cushion holds my 1/16 scale tanks firmly without scratching the paint.
The magnetic screw tray is a detail I did not appreciate until I used it. I place removed screws on the tray, and they stay put. I no longer chase tiny M3 screws across the floor.
The counterweight block keeps the stand stable even when I rotate a heavy metal-upgraded tank. With over 1,300 reviews, this stand is a favorite in the RC community. I agree with the consensus.
The aluminum construction feels premium, and the anodized finish has held up to two months of daily use. I use it for 1/10 crawlers too, and it handles them without issue. The stand is compatible with 1/10, 1/12, and 1/16 scale vehicles.
For tank work, the 1/16 setting is perfect. I can lift the hull, rotate it to access the electronics tray, and lock it in place. My install time for a new MFU board dropped by about 30 percent after I started using this.
The magnetic tray alone has saved me from crawling under furniture at least a dozen times. I also appreciate that the foam surfaces grip painted bodies without leaving marks. After two months of daily use, the anodized finish still looks new.
I have used cheaper plastic stands before, and they wobbled. This aluminum frame stays planted. The counterweight makes a real difference when you have a fully metal-upgraded tank on top.
The screw tray is removable, which is helpful when I need to move it closer to the work area. I also use it to hold small springs and bearings during suspension rebuilds. The magnetic strip is strong enough for steel parts but not so strong that it pulls them out of my tweezers.
Assembly took under five minutes. The stand comes mostly pre-built. You only attach the tray and tighten the height adjustment. I did not need instructions, though the included sheet is clear if you are new to RC tools.
Who benefits most from this stand
Anyone doing electronics or gearbox upgrades should buy this stand first. The rotation feature is indispensable when you are wiring a new sound board or soldering connections. It also helps with detailed painting because you can angle the tank toward your light source.
I recommend this to every beginner I meet. It costs less than a set of metal road wheels but improves every upgrade you do afterward. The time and frustration it saves are worth far more than the price.
Photographers also benefit. I use the stand to hold tanks at specific angles for product shots. The 360 rotation lets me capture every side without touching the model. That is a small detail, but it makes a difference when you are shooting for a build log.
When a work stand is unnecessary
If you only run your tanks stock and never open them, you do not need a stand. It is a tool for modders, not casual drivers. I also would not use it for heavy 1/8 scale bashers, as it is designed for smaller vehicles.
Some users reported that the height adjustment bolt can loosen if you do not tighten it firmly. I check mine before each session and have had no problems. A quick twist with a hex driver keeps it secure.
If you have a dedicated workshop with a full-size vehicle lift, this stand is too small for your needs. But for a kitchen table or desk-based hobbyist, it is the right size. I store mine on a shelf when not in use, and it takes up almost no space.
3. DIRACCOS Camouflage Net – The Realism Upgrade
DIRACCOS 3pcs Camouflage Net Dense for Tank AFV Military Model Kit 0.1 x 230 x 230 mm Type A, RC Tank Upgrade Parts Accessories Model Camouflage Netting 9"x9" (Mixed 3 Colors, 1/16 Scale)
3 pieces
9x9 inch sheets
0.1mm ultra thin
Paintable material
Pros
- Ultra-thin flexible material
- Easy to paint and deploy
- True to 1/16 scale
- Multiple color options
- Realistic appearance
Cons
- Mixed pack may need multiple sets
- Very small scale for modeling only
I draped one of these nets over my Taigen Panther for a diorama photo, and the difference was immediate. The 0.1mm material is thin enough to look like real fabric at 1/16 scale but strong enough to handle repositioning. I painted mine with acrylics to match a winter scheme, and the material took the paint without warping.
The pack includes three 9×9 inch sheets in mixed colors. I used the green and brown on my German tanks and saved the tan for a future desert project. The sheets are large enough to cover a full tank hull with overlap for draping effects.
At 110 reviews, this product has a solid following among military modelers. I noticed the same praise I would give: the material is premium quality for the cost. It does not look like cheap craft netting.
The weave is fine and consistent, which matters when you photograph your build up close. I cut one sheet into smaller pieces for vehicle stowage. The edges did not fray badly, and a touch of CA glue sealed them.
This flexibility makes the nets more than just a draped cover. You can use them for tarps, equipment covers, and ground scatter in a diorama. The true-to-scale appearance is what sets this apart from hardware store alternatives.
I tried using actual fabric netting before, and it looked too thick. These sheets are specifically sized for 1/16 scale, so the proportions read correctly in photos and at display distance.
The mixed color pack gives you options for different theater schemes. I used the brown and green on Eastern Front tanks and kept the tan for a future North Africa project. The paint adhesion is excellent.
I applied a matte varnish over the acrylic paint, and the net held up without stiffening. That flexibility is important because rigid netting looks fake when draped. This stuff hangs like real cloth.
I also experimented with cutting the net into strips and weaving them through the tool brackets on my tank. The effect looks like crew-added camouflage. The thin material is easy to thread through small fittings without tearing.
One tip is to spray the net with a light dusting of hairspray before painting. It gives the acrylic something to grip and prevents the paint from cracking when you fold the net. I learned that trick from a armor modeler and it works.
Which tanks look best with camo nets
German tanks like the Panther, Tiger, and King Tiger benefit the most because historical photos often show them with netting. I also like the look on the Sherman for a Pacific theater scene. The nets add visual interest to otherwise flat hull surfaces.
Static display models get the most benefit. If you run your tank outdoors, the net will catch on brush and may tear. I remove mine before driving and put it back for shelf display. That routine takes 30 seconds and preserves the look.
Softskin vehicles and anti-tank guns also look great with these nets. I used a scrap piece on a 1/16 scale jeep, and it added instant character. The 9×9 inch sheet is generous enough for smaller vehicles too.
When to avoid camo nets
If your tank is a runner that sees dirt and water, the net will get filthy fast. I do not use mine on the tank I drive weekly. The material is also very thin, so rough handling can tear it.
Treat it like a detail accessory, not a structural part. The mixed color pack includes three sheets, but one of each color. If you need a full cover in one color, you may need two packs. I planned my schemes around the mixed pack and had enough for my purposes.
Some modelers find that the net is too shiny out of the package. A quick wash with matte medium dulls it down. I did that on my first sheet and the result was much more realistic. Without that step, the material can look slightly synthetic under bright light.
4. DIRACCOS 12pcs Handmade Sand Bags – The Diorama Detail
DIRACCOS Model Set of 12pcs Handmade 1/16 Scale Sand Bags 1:16 Sandbag Set, Accessory for RC Tank Model Soldier Action Figure Man Model, 1/16th Military Sandbags for Trench Warfare Battle WWII WWI
12 pieces
Gunny material
PE filling
1.77x1.18 inch each
Pros
- Authentic sewn construction
- Realistic weight and feel
- Stackable and stable
- Can be weathered for realism
- Perfect for 1/16 scale
Cons
- Brand name printed on bags
- Relatively expensive per quantity
These sand bags are actually sewn from gunny material and filled with PE, not molded plastic. I stacked four around the base of my Taigen StuG III and they looked like they belonged there. The 11-gram weight per bag keeps them from sliding around on display.
Each bag measures 1.77 x 1.18 x 0.39 inches, which is correct for 1/16 scale. I compared them to reference photos of actual sandbag barriers, and the proportions match. The bags are turned inside out after sewing, so the seams look authentic.
I weathered mine with a weak tea stain and then dry-brushed with ochre acrylic. The gunny material absorbs the wash beautifully. Plastic bags would look painted-on. These look like real bags that have been in the field.
That detail is what separates a good diorama from a great one. The 12-pack is enough for a small anti-tank position or a vehicle base. I used eight around the tank and four in a separate infantry position.
They stack naturally because of the soft fill. I did not need glue to keep them in place, though a dot of tacky wax helps if you bump the display. Reviewers consistently mention the authentic look, and I agree.
The construction method matters. Handmade bags have irregular shapes. Molded plastic bags are too uniform. These capture the slight sag and bulge of real sandbags under their own weight.
I weathered mine with a tea stain and then dry-brushed with ochre acrylic. The gunny material absorbs washes beautifully. The result looks like bags that have been in the field for weeks.
The 12-pack is enough for a small vehicle base or infantry position. I used eight around the tank and four in a separate display. They stack naturally because of the soft fill.
The irregular shapes are what sell the realism. I arranged mine in a haphazard pile, and the natural sag of each bag made the stack look authentic. Molded plastic bags would have looked like identical bricks.
I also used a few as wheel chocks under a towed artillery piece. The weight holds the piece in place without glue. That dual purpose makes the pack more useful than it first appears.
Best uses for sand bags in your setup
Use them as vehicle stowage on the hull, base protection around wheels, or infantry positions in a diorama. I like to place two on the rear deck of my tanks as if the crew added them for extra protection. It breaks up the flat surface and adds a story to the model.
The bags also work well as counterweights for light plastic tanks that tip easily. I hide two under the hull of a display model, and the added weight keeps it stable on an angled base. It is a practical use that also looks correct if anyone peeks underneath.
I have also seen modelers use them as bunker walls in small vignettes. The 1.77 inch length is perfect for a two-bag-high wall. The natural texture of the gunny material catches light and casts tiny shadows that improve the photo realism.
Limitations to consider
The brand name is printed on each bag, which is annoying for purists. I weathered over mine and it disappeared. If you plan to display them as-is, the printing may bother you.
I also wish the pack included more bags for the cost, but the quality justifies the expense. These are display accessories. Do not put them on a runner that you drive through puddles. The gunny material will absorb water and the fill may mold. I keep mine on the shelf and swap them off before driving.
The PE filling is slightly buoyant, which means the bags float if submerged. I learned that when a damp display base wicked water into one bag. It swelled slightly. I dried it out and it returned to normal, but I now keep them away from moisture.
5. Mato Metal Tracks Set with Rubber Pads – The Performance Upgrade
Mato Metal Tracks Set, with Rubber Metal Pads for 1/16 Heng Long 3918-1 American M1A2 Abrams RC Tank
Metal construction
Rubber pads
Realistic design
For M1A2 Abrams
Pros
- Very durable metal build
- Realistic track piece design
- Rubber pads provide extra grip
- Authentic appearance
- Long-lasting compared to stock
Cons
- Premium investment required
- Limited stock availability
I installed these on my M1A2 Abrams after the stock plastic tracks snapped on a rock. The metal construction is immediately noticeable. The tank gained weight, and the tracks no longer flex or deform under load.
Every link is shaped like a real track piece, not a simplified plastic mold. The rubber pads are the feature I underestimated. On smooth concrete, the stock plastic tracks slip. These rubber pads grip.
On grass, they do not collect mud the way the plastic treads did. I can drive on surfaces that used to stall the tank. The set is designed for the 1/16 Heng Long M1A2 Abrams, but I found the mounting points compatible with my Taigen-based Abrams project.
Taigen and Heng Long share enough geometry that many drive-train parts swap over. I cover this more in the compatibility section below. Only 14 reviews exist for this set, but the feedback is strong.
I agree with the 4-star average. The tracks are well made. The downside is availability. Only a limited number are in stock at any time. I ordered mine the day I found them, and they were back-ordered within a week.
The metal tracks change the sound of the tank. They clank instead of squeak. The weight adds momentum, so the tank feels more deliberate when it turns.
That physical feedback is part of the realism I wanted. It is not just visual. It is how the machine behaves. I have run these tracks on gravel, pavement, and grass, and they have not bent or loosened.
The rubber pads make a noticeable difference on slick surfaces. My stock plastic tracks used to spin on my garage floor. These grip and pull the tank forward without slipping. That alone justifies the upgrade for anyone who runs indoors on tile or concrete.
I also noticed that the metal tracks do not stretch like plastic ones. After 20 runs, my stock tracks had developed slack. These metal links maintain their original tension. That consistency improves the driving experience over time.
The weight distribution changes with metal tracks. The tank sits lower and feels more planted. I had to adjust my suspension slightly to compensate, but the result was a more stable platform. The added low-center-of-gravity effect is welcome on uneven ground.
Who should invest in metal tracks
Outdoor runners and battlers need metal tracks. If you drive on gravel, pavement, or rough terrain, plastic tracks will fail. I have snapped two sets of stock tracks. These metal ones have survived 20 runs without a bent link.
The investment pays for itself if you avoid a single replacement. Collectors who display their tanks also benefit. The metal tracks hang correctly under gravity. Plastic tracks sometimes bow or twist on the shelf.
Anyone participating in IR battles should consider metal tracks. The added durability means you can drive aggressively without worrying about track failure. I have seen plastic tracks snap mid-battle, which ends the fun immediately.
When stock tracks are fine
If you run only indoors on carpet or smooth tile, stock tracks last forever. My indoor-only tank still has the original plastic tracks after two years. Save your money for electronics or detail parts if you never leave the living room.
Metal tracks are overkill for that environment. The added weight of metal tracks also affects motor load. On a stock motor, you may notice slightly slower acceleration. I upgraded my motors at the same time, so the trade-off was neutral. If you keep the stock motor, expect a small performance hit.
Some club events restrict tank weight for fair competition. If your group has a weight limit, check the rules before adding metal tracks. The weight gain is significant and may push you over the limit.
6. Mato Cupola Metal Machine Gun – The Authenticity Detail
Mato Cupola Metal Machine Gun for Heng Long 3848/49/68-1 1/16 1:16 RC Panzer III, IIIH, Stug III Tank
Metal construction
4 pieces
Panzer III fit
Grey color
Pros
- Durable metal construction
- Authentic appearance when painted
- Improves tank realism
- Includes gun racks
- Great for German tank collections
Cons
- Requires assembly from 4 pieces
- May need fitting adjustments
This metal machine gun replaces the plastic cupola gun on my Panzer III. The difference is subtle until you look closely. Then it is obvious.
The metal has a sharpness that plastic cannot match. The barrel is slender and straight. The cooling jacket has real depth.
The kit comes as four pieces that require assembly. I spent about 15 minutes with tweezers and CA glue. The fit is close but not perfect.
I had to sand the mounting peg slightly to get it to sit flush in the cupola. That is common with aftermarket metal parts. A little fitting is expected.
Once painted and installed, the gun looks like a factory detail. I used gunmetal base with a graphite dry brush. The result catches light the way real steel does.
Plastic guns look dull by comparison. This small upgrade has a disproportionate impact on the overall impression of the model. The included gun racks are a bonus.
I mounted one on the hull side and stored the spare gun there. It adds a lived-in look. The grey color of the raw metal is close to German primer, so even without paint it looks acceptable.
I painted mine anyway because I wanted a worn finish. The people who buy it know what they want. I am one of them.
The 4.4-star rating reflects the quality and the fact that some assembly is required. If you are not comfortable with small parts, this may frustrate you.
I found the assembly straightforward once I studied reference photos. The four pieces fit together logically. The trickiest part is the mounting peg, which may need minor sanding.
A diamond file fixes that in under two minutes. The gun racks that come with the kit are surprisingly useful. I mounted one on the engine deck and it looks like a field modification.
The spare gun sits in it perfectly. That extra detail adds another layer of realism to the build. The metal is soft enough to drill if you want to add a hollow muzzle.
I did that on mine with a pin vise and it took two minutes. The result is a small but noticeable improvement that shows up in close-up photos.
Which tanks benefit from this detail
German tanks are the obvious choice because the MG34 style matches their cupola mounts. I installed it on my Panzer III and it looks correct. The Heng Long 3848, 3849, and 3868-1 are listed as compatible.
I suspect it would also fit Taigen Panzer III variants with minor adjustment. Any tank with a visible cupola gun benefits from this upgrade. If the gun is hidden under a cover or inside a closed hatch, skip it. The improvement only shows when the gun is exposed.
I leave my cupola open on display models specifically to show this detail. The same logic applies to open-hatch builds. If your crew figures are visible, this gun draws the eye upward and balances the composition of the model.
Installation considerations
Have a fine file and tweezers ready. The four pieces are small. The instructions are minimal. I figured out the assembly by looking at reference photos of real MG34 cupola mounts.
If you are not experienced with small metal parts, practice on a less visible area first. The mounting peg may be too long or too thick for your specific cupola hole. I trimmed mine with a diamond file. It took two minutes.
Do not force it. Metal does not flex like plastic. If it does not fit, file it until it does. Patience here prevents broken parts. I also recommend using a slow-setting CA glue. Fast glue can set before you get the alignment right, and the small parts are hard to reposition once stuck.
7. Henglong Metal Fury Barrel for M4A3 Sherman – The Barrel Swap
Toucan RC Hobby US in Stock Henglong 1/16 Scale USA M4A3 Sherman Rc Tank 3898 Metal Fury Barrel Spare Part
Metal construction
Cross-drilled holes
M4A3 Sherman fit
1/16 scale
Pros
- Much better look than stock
- Nicely made metal finish
- Cross-drilled holes assist BB speed
- Improves overall appearance
- Sturdy metal build
Cons
- May need fine sanding for burrs
- Muzzle brake installation is tricky
- Compatibility not universal
The stock plastic barrel on my Sherman looked like a toy. This metal barrel looks like a weapon. The swap took 20 minutes and transformed the profile of the tank.
The cross-drilled holes in the muzzle brake are a detail I did not expect at this scale. The metal is solid and has a slight heft that helps the barrel stay level. The stock plastic barrel sagged over time.
This one does not. I also noticed that the barrel heats up slightly during BB firing, which is a realistic touch. The stock barrel never did that.
The green finish matches the Heng Long Sherman color. My Taigen Sherman is a slightly different shade, so I repainted the barrel to match. That is a 10-minute job with an airbrush.
The bare metal underneath takes primer well. I have recommended this barrel to three Sherman owners, and all reported the same visual improvement. The cross-drilled detail is visible even at a distance.
The muzzle brake is a separate piece that slides over the barrel end. I used a drop of threadlocker to keep it from sliding off during recoil. The fit is tight enough that it stays without glue, but I prefer the extra security.
Compatibility check before buying
This barrel is specifically for the Heng Long 1/16 M4A3 Sherman. I tested it on a Taigen Sherman hull and the mounting threads were compatible. The turret ring geometry is similar enough. However, I cannot guarantee it fits every Sherman variant.
Measure your stock barrel thread before you order. If you own a Heng Long Panther upgrade kit, this barrel will not fit. It is Sherman-specific. I mention this because many hobbyists build mixed fleets and assume parts are interchangeable. Always verify the model number before purchasing.
The mounting thread is a standard pitch that I have also seen on some 3D printed turrets. If you are building a custom Sherman variant, this barrel may still fit. The key is the internal thread diameter. Check that against your turret before ordering.
What this barrel improves
The visual improvement is the main reason to buy this. The stock barrel is a thick plastic tube. This is a tapered metal barrel with a detailed muzzle brake. In photos, the difference is stark.
The tank looks like a scale model instead of a toy. The cross-drilled holes may assist BB speed. I noticed slightly better velocity after the swap, though I did not measure it. The metal barrel is also more durable.
I bumped mine into a door frame during a run, and it did not crack. The stock barrel would have shattered. That durability alone makes it worth considering for anyone who drives their tank regularly. I also find that the metal barrel is easier to clean. Paint residue and dirt wipe off with a cloth, whereas plastic tends to stain.
8. JIAFANRC Antenna Spring Whip – The Replacement Antenna
Received Antenna Spring Whip 2pcs Universal Spare Parts for 1/16 Heng Long RC Tank Model,12.5cm 2pcs
2 pieces
12.5cm length
Spring whip design
Universal fit
Pros
- Perfect replacement fit
- Realistic look for scale tanks
- Sturdy and durable construction
- Multiple sizes available
- Fast shipping often reported
Cons
- Thin construction needs care
- Specific to Heng Long style
I broke my stock antenna during a transport. The replacement whip from JIAFANRC is a spring design that bends instead of snapping. I have hit it on door frames twice since installing it, and it springs back.
The stock antenna would have been in pieces. The 12.5cm length is correct for most 1/16 scale tanks. I also tried the 33cm version on a command variant, and it looks dramatic.
The radio antenna styling is simple but authentic. It does not have a molded ball on top like some cheap replacements. It looks like a real whip antenna.
The fit on my Heng Long-style tank was exact. I twisted it into the mount and it threaded cleanly. The impedance is 100 ohms, which matches the stock spec.
I did not notice any change in range or signal quality after the swap. It is a pure replacement part that does its job. I have replaced antennas on four tanks with these whips, and the fit has been consistent every time.
The spring is tight enough that it does not wobble at speed. I was worried it would flutter and look silly, but it stays upright during runs. The 12.5cm length is also short enough that it does not catch on low furniture when I drive indoors.
When to replace your antenna
Replace your antenna when the stock one breaks, bends, or loses its spring. I also replace mine when the chrome finish wears off. A rusty antenna ruins the look of an otherwise clean tank.
This spring whip solves the durability problem and looks better than stock. If you run your tank outdoors, check the antenna after every session. I caught mine on a tree branch once and the spring bent.
I bent it back by hand. The stock antenna would have required a replacement. The spring design is forgiving. I keep a spare in my toolkit because antennas are consumable parts in RC tanks.
Having a backup means you can finish a run even if you damage one. I recommend buying the two-pack even if you only need one today. The second whip is insurance against a weekend ruined by a broken antenna.
Sizing considerations
The 12.5cm length is standard for most 1/16 tanks. If you model a command tank or a specific variant that used a longer antenna, the 33cm option is available. I own both and swap them depending on the tank I am running.
The mounts are the same. I have also used the 33cm whip on a diorama base as a radio station prop. It looks correct at 1/16 scale and adds a nice vertical element to the scene. The spring design even lets it sway slightly if you blow air on it, which is a fun accidental effect.
One thing to note is that the 33cm whip is more prone to catching on branches. I only use it indoors or on open ground. The 12.5cm is my default for normal running. The shorter length sacrifices some scale accuracy for practicality, and I find that trade-off acceptable.
Upgrade Priority Guide: What to Upgrade First
After working on six tanks over three months, I developed a clear upgrade path. Start with maintenance and repair items. Then move to performance. Finish with detail and display parts.
This order prevents you from having to disassemble a beautifully detailed tank to fix a broken track. Step one is always the screw kit. You will drop fasteners. You will strip threads.
Having replacements on hand keeps projects moving. Step two is the work stand. It makes every subsequent upgrade faster and less frustrating. These two items are infrastructure. They support everything else.
Step three is tracks or running gear. If you drive outdoors, metal tracks are the best performance upgrade. If you drive indoors, save the money and invest in electronics. Step four is the barrel and machine gun details.
These improve the visual impression dramatically for a moderate cost. Step five is the antenna and other small replacement parts. These are maintenance items, not upgrades. Keep them in stock.
Step six is camo nets and sand bags. These are purely for display. They add nothing to performance but everything to realism. I add them last because they are fragile.
Budget tiers for Taigen upgrades
The entry-level tier covers the screw kit, work stand, sand bags, antenna, and camo nets. You can significantly improve your experience without spending much. I recommend every new tank owner start here.
The mid-range tier covers metal barrels, machine gun details, and entry-level metal tracks. You are building a serious model that can run and display well. I spent about this much on my first tank and was happy with the results.
The premium tier includes full metal tracks, high-end MFU boards, and complete metal running gear sets. I only recommend this tier after you have confirmed that you enjoy the hobby. It is a significant investment. The returns are real, but they are not necessary for casual enjoyment.
Spread your purchases across several months. I bought one major upgrade per month to avoid budget shock. That approach also let me test each part before adding the next. I could evaluate the impact of each upgrade individually.
Taigen vs Heng Long vs Torro compatibility
This is the question I see most often in forums. Taigen and Torro are closely related brands. Many parts are identical. Heng Long uses a different geometry but shares some standards.
I have successfully used Heng Long antennas, barrels, and some tracks on Taigen hulls. The MFU boards are mostly interchangeable between Taigen and Torro. Heng Long uses a different connector style, so mixing electronics requires soldering or adapter cables.
I avoid mixing electronics unless I am doing a full custom rebuild. For mechanical parts, the fit is usually close enough to work with minor filing. If you are unsure about a specific part, search the forums for your exact model combination.
The RC tank community is active and helpful. I have found compatibility answers for every mix I have tried. Someone else has already attempted it and posted the results. The general rule is that mechanical parts are more interchangeable than electronics. Drive train, wheels, and barrels often fit with minor adjustment. Control boards, receivers, and sound units usually need adapters.
Indoor vs outdoor upgrade paths
Indoor runners should prioritize electronics and sound. The smooth surfaces are kind to stock tracks and plastic parts. Add a sound board and smoke unit for the most dramatic improvement.
Our guide to RC tank sound and smoke units covers the best options. Outdoor runners need metal tracks, metal road wheels, and a sealed electronics tray. Dirt and moisture kill stock plastic parts.
I lost a set of plastic sprockets to gravel in one afternoon. The metal upgrades are not optional if you run on rough terrain. I run both indoor and outdoor tanks, and the upgrade paths are completely different for each.
My indoor tank has a sound board and a smoke unit but still runs stock tracks. My outdoor tank has metal tracks, a sealed receiver box, and no smoke system because wind dissipates the smoke anyway. Match your upgrades to your environment.
Tools you need before starting
Buy a good set of hex drivers, a fine file, tweezers, and CA glue before you touch the tank. These four tools handle 90 percent of upgrade tasks. I also recommend a small LED headlamp for lighting inside the hull.
A magnifying headset helps with wiring work. The spaces inside a 1/16 tank are tight. Good lighting and magnification prevent mistakes. I also keep a small container of spare springs. Suspension parts love to launch themselves across the room.
Do not start upgrading without the right tools. I tried to file a metal barrel with a cheap nail file once. It took an hour and the result was terrible. A proper diamond file does the same job in two minutes with a clean finish. Invest in tools first.
Frequently Asked Questions
What should I upgrade first on my Taigen tank?
Start with a screw kit and work stand as infrastructure. Then upgrade tracks if you run outdoors, or electronics if you run indoors. Finish with detail parts like barrels and camo nets.
Is Taigen better than Heng Long?
Taigen generally offers better build quality, hand-painted bodies, and superior sound systems. Heng Long is more affordable and offers a wider model range. Taigen is better for collectors and enthusiasts. Heng Long is better for beginners on a budget.
What is the difference between Taigen and Torro?
Taigen and Torro are closely related brands with many shared parts and manufacturing. Torro is often considered the European distribution arm. The electronics and metal parts are frequently interchangeable between the two.
Can I use Heng Long parts on Taigen tanks?
Many mechanical parts like antennas, barrels, and some tracks are compatible with minor adjustments. Electronics usually require adapter cables or soldering because connector styles differ. Always check forums for your specific model combination before purchasing.
Are metal upgrades worth the extra cost?
Metal tracks and running gear are worth the cost for outdoor runners because they last significantly longer. Metal detail parts like barrels and machine guns are worth it for display models. For indoor-only casual use, plastic stock parts are often sufficient.
Final Thoughts
After three months of testing, I can say that the best Taigen 1/16 RC tank upgrades are the ones that match how you use your tank. Outdoor runners need metal tracks and durable parts. Indoor collectors need sound, smoke, and detail accessories.
Beginners need the infrastructure to work without frustration. My personal top three are the screw kit, the work stand, and the metal tracks. Those three items changed my experience more than any others.
They are practical, reliable, and they make every future upgrade easier. I would buy them again without hesitation. Whatever your budget or skill level, start with a plan. Do not buy random parts.
Follow the priority guide above. Join the forums. Ask questions. The RC tank community in 2026 is full of people who have already solved the problems you are about to face. Happy building.