If you have spent any time in the scale armor modeling community, you have probably heard the name Aber come up in conversations about photo-etch detail sets. Aber is widely regarded as the gold standard for brass PE upgrade parts, and for good reason. Their etching quality, part count, and fine detail are in a class of their own. But here is the catch: Aber sets are only available through specialty hobby retailers like HobbyLink Japan, Hannants, and Sprue Brothers. You will not find them on Amazon.
That said, the same type of photo-etched brass detail upgrades that Aber is known for are available on Amazon from two brands that compete directly in the same niche: Tamiya and Eduard. Both produce high-quality PE sets for 1/35 scale armor models, and both serve the exact same purpose as Aber sets, which is replacing soft plastic or vinyl parts with crisp, precision-etched brass that takes your build to a higher level of realism.
Our team spent weeks comparing available PE detail sets for armor models, looking at etching quality, part fit, value, and what actual modelers had to say about each one. Whether you are hunting for the best Aber photo-etch armor sets and need an Amazon-available alternative, or you simply want the best photo-etch upgrades you can get with Prime shipping, this guide covers our top 6 picks in 2026.
Table of Contents
Top 3 Picks for Photo-Etch Armor Detail Sets


Tamiya King Tiger Zimmerit PE Set
- 1/35 Scale
- Zimmerit Texture
- 106 Reviews
- Adhesive Application

Eduard Jeep Willys MB PE Set
- 1/35 Scale
- Perfect 5-Star Rating
- Tamiya Compatible
- Fine Detail
6 Best Photo-Etch Armor Detail Sets in 2026
| Product | Specifications | Action |
|---|---|---|
|
Tamiya M1A1/A2 Abrams PE Set
|
|
Check Latest Price |
 Tamiya Leopard 2 A6 PE Detail Set
|
|
Check Latest Price |
 Tamiya Cromwell PE Grille Set
|
|
Check Latest Price |
 Tamiya Leclerc Series 2 PE Set
|
|
Check Latest Price |
|
Eduard Jeep Willys MB PE Set
|
|
Check Latest Price |
|
Tamiya King Tiger Zimmerit PE Set
|
|
Check Latest Price |
1. Tamiya M1A1/A2 Abrams PE Set – Best for Modern US Armor
35273 1/35 Photo Etch Parts Set US M1A1/A2 Abrams by Tamiya
Scale: 1/35
Material: Photo-Etched Brass
Vehicle: M1A1/A2 Abrams
Parts: Grilles and Screens
Pros
- Eliminates difficult mesh cutting
- Significantly improves finished appearance
- Essential for older Tamiya and Dragon kits
Cons
- TUSK II variant has incomplete rear parts
- Loader hatch part numbers may differ from some kits
I have used this Tamiya M1A1/A2 Abrams photo-etch set on two separate builds, and it is one of those upgrades that genuinely transforms the finished model. The biggest win is the bustle rack mesh. Anyone who has tried cutting vinyl mesh to size for the Abrams rear deck knows how frustrating it can be. This PE set replaces that entire process with pre-cut brass screens that drop right into place and look far more realistic than anything you could achieve with cloth or plastic mesh.
The set includes grilles, screens, and several fine detail parts that replace the kit’s plastic equivalents. At 4.7 out of 5 stars across 23 reviews, the consensus among builders is clear: this set is essential if you are working with older Tamiya or Dragon Abrams kits that did not come with PE parts included. One reviewer mentioned that it completely changed the look of his finished build, and I agree with that assessment based on my own experience.
That said, there is a caveat worth knowing. If you are building the TUSK II variant, some modelers have found that the rear bustle rack net parts are incomplete for that specific configuration. The parts quality is excellent, but the set was clearly designed with the standard M1A1 and M1A2 in mind. Also, loader hatch part numbers can differ from some kit versions, so cross-reference your kit instructions with the PE set instructions before starting.
What Vehicles This Set Fits
This PE set is designed specifically for Tamiya’s 1/35 M1A1 and M1A2 Abrams kits. It also works with older Dragon Abrams releases that lack included PE. If you are building a standard M1A1 or M1A2 from Tamiya, this set will drop in cleanly. For TUSK or TUSK II variants, verify part coverage before committing.
The set is especially valuable for older Tamiya Abrams kits from the 1990s and early 2000s era, which shipped with only vinyl mesh for the engine grilles. Modern Tamiya Abrams releases sometimes include basic PE, but even then this aftermarket set often provides more detailed replacements.
Skill Level and Assembly Tips
I would rate this as an intermediate-level PE set. The parts are not as tiny as some Aber sets (which forum users describe as “graduate-level”), but you still need a fine-tip tweezers and a good CA glue applicator. The grilles are straightforward to install. Take your time aligning the screens and use a minimal amount of glue to avoid visible residue.
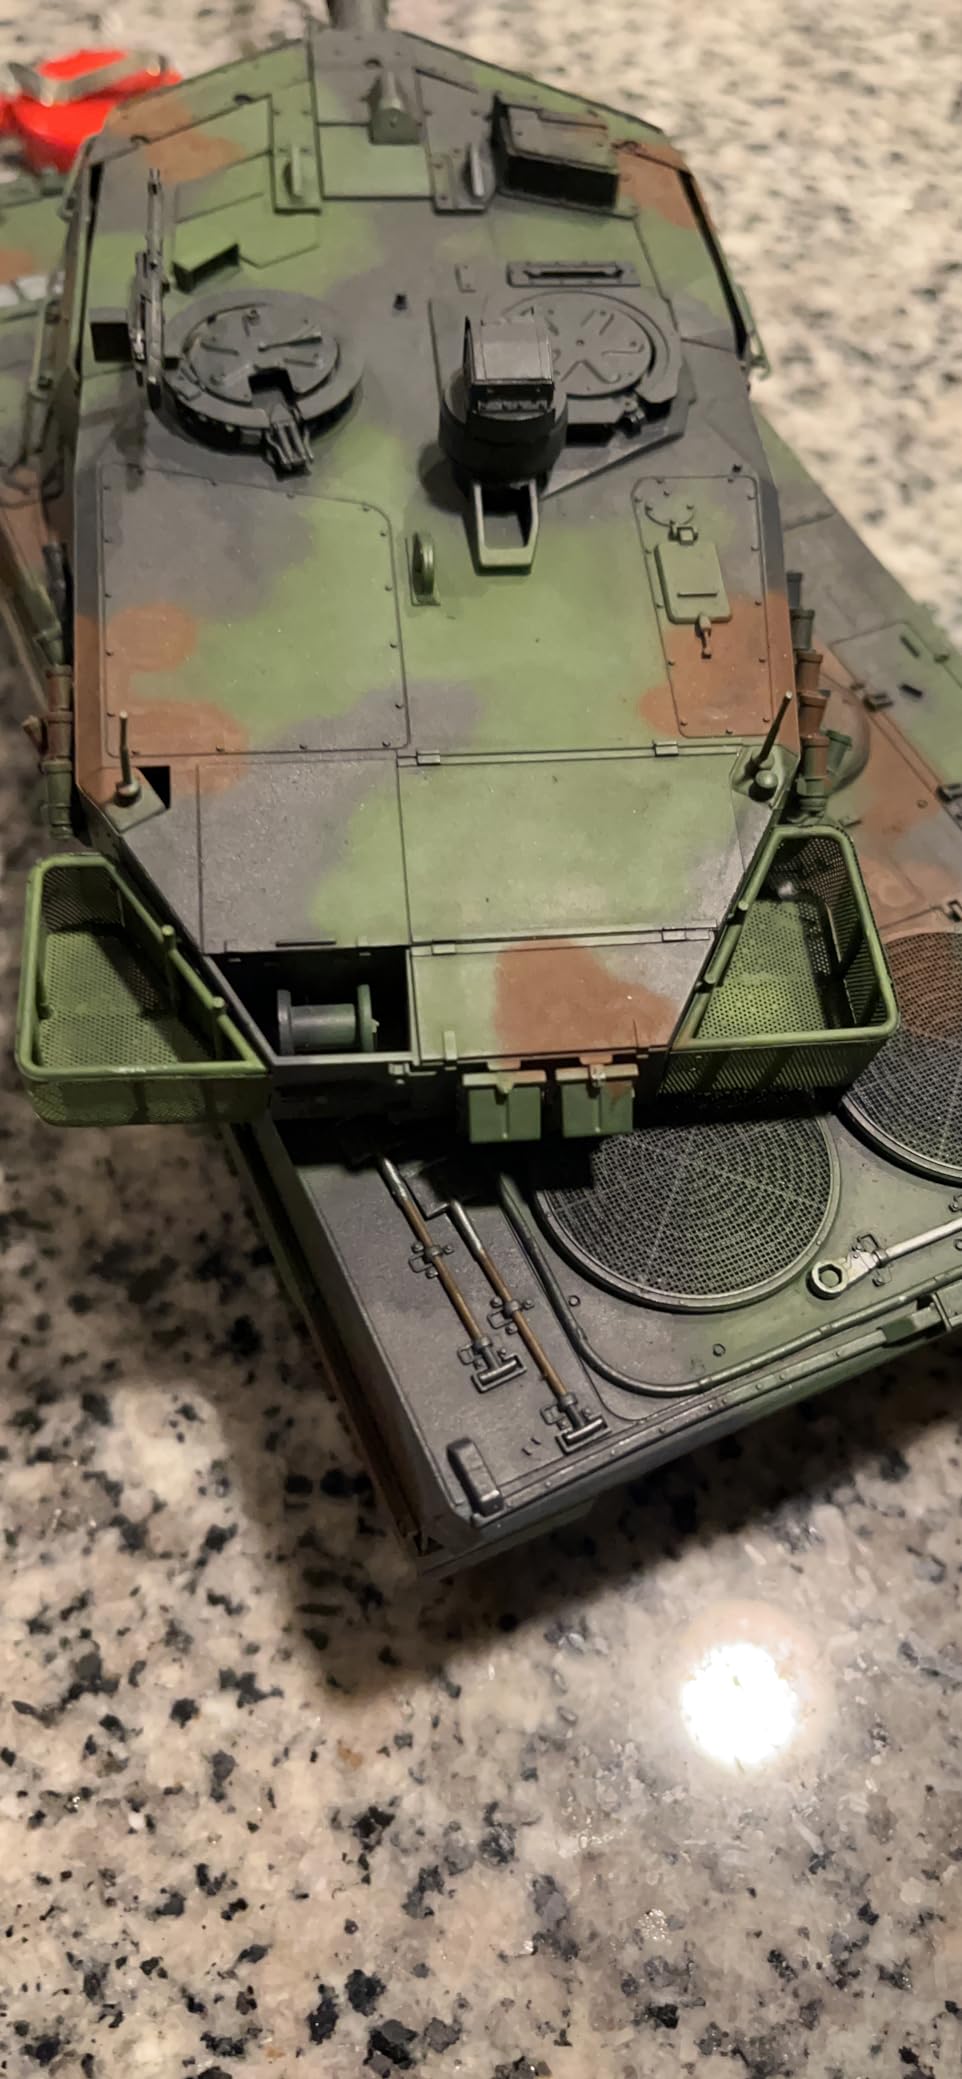
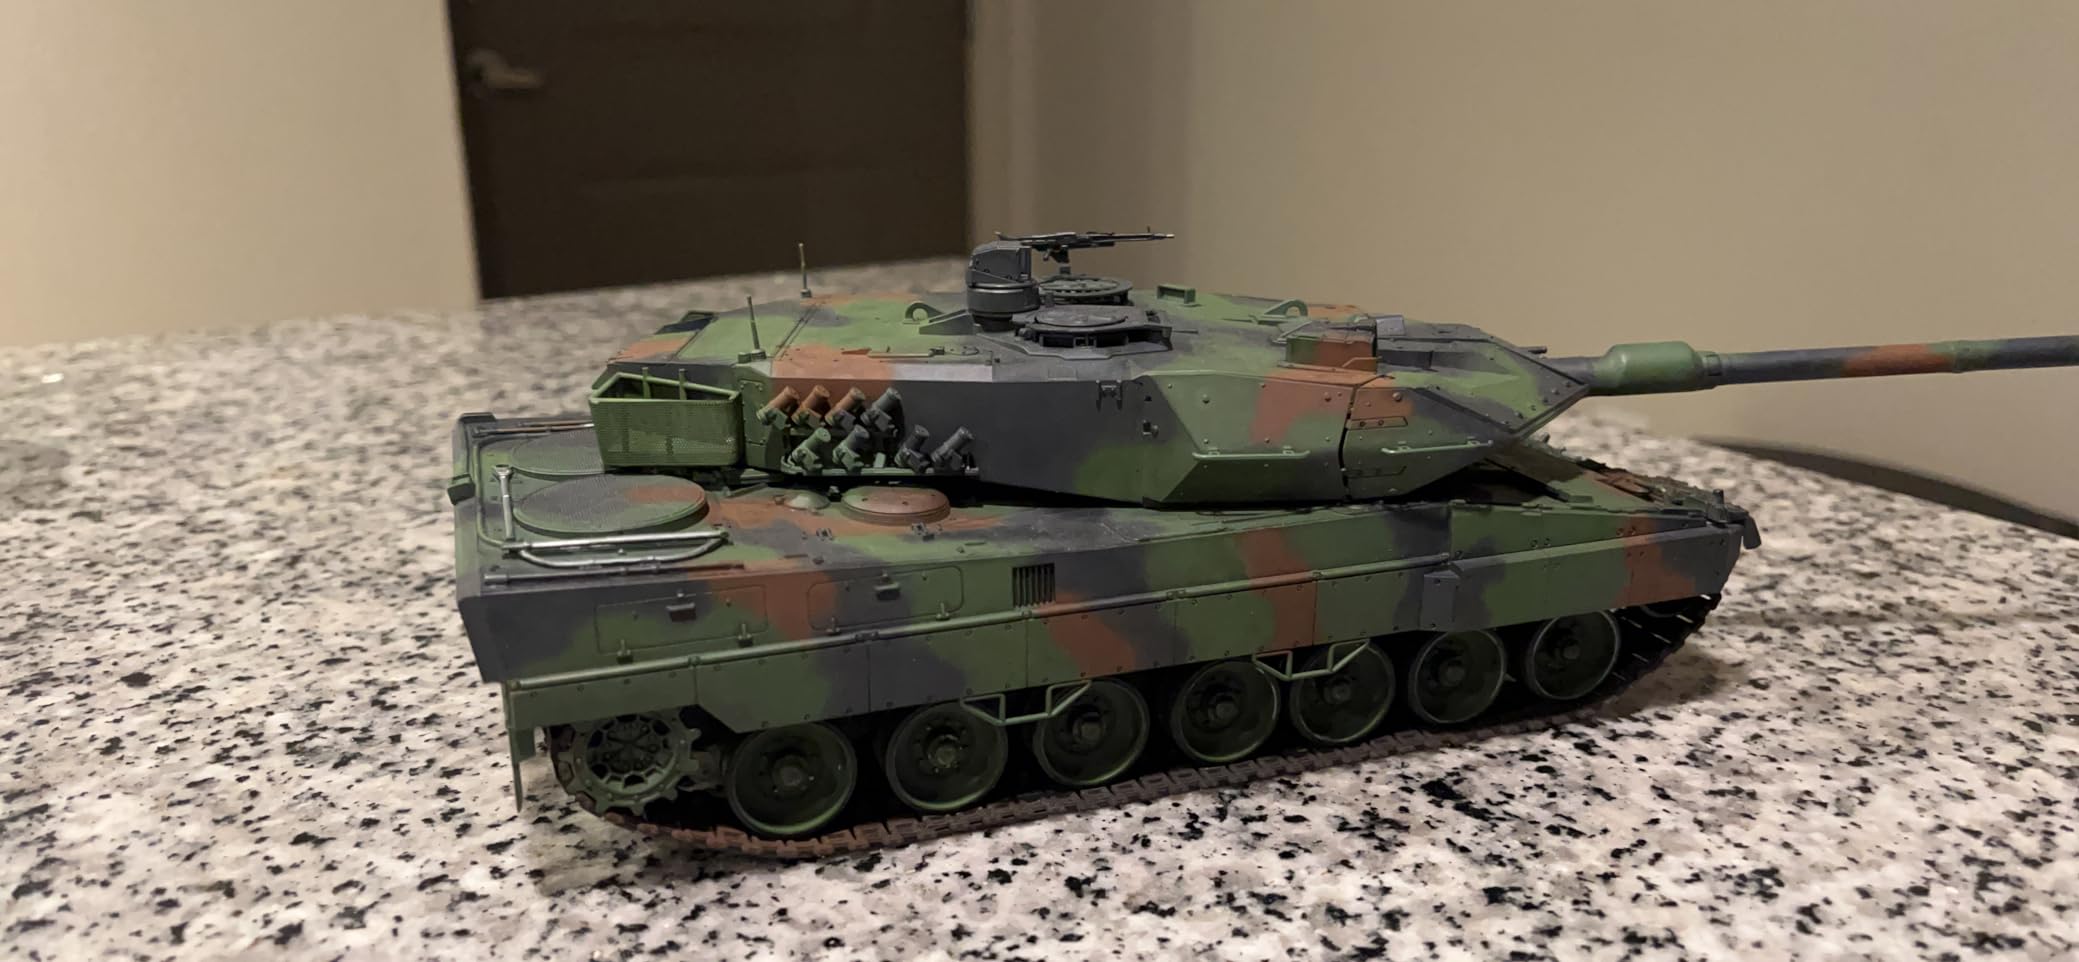
2. Tamiya Leopard 2 A6 PE Detail Set – Best for Modern European Armor
Tamiya 1/35 Leopard 2 A6 Photo Detail Set # 35272
Scale: 1/35
Material: Photo-Etched Brass
Vehicle: Leopard 2 A6
Includes Decals
Pros
- Much cleaner than cloth mesh
- Quality Tamiya fit and finish
- Makes Leopard build more realistic
Cons
- Pricey for quantity of parts
- Packaging can cause bent parts during shipping
The Leopard 2 A6 is one of the most popular modern armor subjects, and this Tamiya PE detail set addresses the same issue that many armor PE sets solve: replacing the cloth or vinyl mesh that comes in the base kit. On my Leopard 2 A6 build, the cloth mesh was genuinely frustrating to cut and shape. This PE set eliminated that problem entirely and produced a much cleaner, more realistic appearance.
At 4.7 stars from 23 reviews, builders consistently praise the quality of the brass parts and the improvement over the kit-supplied mesh. One modeler noted that it was “much easier and cleaner looking than the cloth mesh provided,” which mirrors my own experience. The parts are precision-etched by Tamiya, so fit is generally excellent on their own kit. Decals are also included, which is a nice bonus.
The main downside is value perception. Several reviewers mentioned that the set feels expensive given the actual quantity of brass parts you receive. I understand that criticism, though I would argue the improvement in the finished model justifies the cost. A more practical concern is packaging: multiple reviewers, including one from Japan, reported that the thin brass sheet arrived bent because it was shipped in a simple envelope with no rigid protection.
If you order this set, consider messaging the seller to request rigid packaging. A bent PE sheet is still usable for flat parts like grilles, but any parts that need to maintain their shape for folding become much harder to work with when the brass has been creased.
Fit and Compatibility
This set is designed for Tamiya’s 1/35 Leopard 2 A6 kit (item 35272). The parts are specifically sized for that kit’s dimensions, so compatibility with other manufacturers’ Leopard 2 kits is not guaranteed. If you are building the Tamiya kit, fit should be spot-on with minimal adjustment needed.
Tips for Best Results
Use a sharp #11 blade to carefully separate parts from the fret. Clean up any attachment points with a fine file before installation. For the mesh grilles, a small drop of thin CA glue at each corner is all you need. Avoid flooding the part with glue, as it can wick through the mesh and create visible residue on the visible side.
When painting the brass grilles, apply a thin primer coat first. Bare brass can resist paint adhesion, especially on the smooth surfaces between the mesh openings. A light mist of Tamiya Fine Surface Primer followed by your base color works well and preserves the fine detail of the etched pattern.
3. Tamiya King Tiger Zimmerit PE Set – Best for German WWII Armor
Tamiya 300012649-1:35 Zimmerit Photo Etching Parts for King Tiger Porsche Variant
Scale: 1/35
Type: Zimmerit Coating Sheet
Vehicle: King Tiger Porsche
Application: Adhesive Sheet
Pros
- Looks like authentic Zimmerit
- Clear instructions
- Good value for the price
Cons
- Requires precision cutting
- Heavier paint coats may obscure texture
- Packaging can cause creasing
This is the most-reviewed product in our lineup with 106 ratings, and for good reason. The King Tiger with Porsche turret is one of the most iconic German WWII armor subjects, and the Zimmerit anti-magnetic coating is a defining visual feature of the real vehicle. This Tamiya set reproduces that texture as a photo-etched adhesive sheet that you apply directly to the model’s hull and turret surfaces.
Compared to hand-applying Zimmerit with a modeling tool (which is how many modelers have historically done it), this PE sheet is dramatically faster and more consistent. The texture pattern looks authentic when painted, and the clear instructions walk you through which sections go where. I found the application process straightforward as long as you take your time with the precision cuts needed to trim the sheet to shape.
The 4.4-star average reflects a few common complaints. The biggest is packaging: multiple reviewers reported that the Zimmerit sheet arrived creased because it was folded or bent in transit. Since this is an adhesive texture sheet, creases are a real problem that can ruin sections. The other issue is that heavier paint applications can fill in the fine texture, defeating the purpose of the detail. A light primer and thin coats are essential.
Application Technique
You will need a sharp hobby knife (X-Acto with a fresh #11 blade) and small scissors. Cut each Zimmerit section slightly oversized, apply it to the model surface, then trim the excess flush. Work one section at a time rather than trying to apply the entire sheet at once. Press firmly to ensure full adhesion, especially around curved surfaces on the turret.
The adhesive backing is reasonably strong, but I recommend applying a thin layer of Micro Set or similar decal setting solution underneath for extra bonding on curved areas. This prevents edges from lifting over time, which is a common issue with self-adhesive PE sheets.
Painting Over Zimmerit
This is where many modelers run into trouble. The Zimmerit texture is relatively fine, and if you apply paint too heavily, it will fill in the grooves and the texture disappears. Use a light mist coat of primer first, then apply your base color in thin, dry-brushed layers. Dunkelgelb (dark yellow) goes on as a base, followed by your camouflage pattern in similarly thin coats.
A wash or filter applied after the base colors will actually enhance the Zimmerit appearance by settling into the grooves. This is one case where less paint on the brush produces a better final result.
4. Eduard Jeep Willys MB PE Set – Best for Soft-Skin and Light Vehicles
Eduard Accessories 35347 Jeep Willys MB 1/4t 4x4 Truck Photo Etched Kit
Scale: 1/35
Material: Photo-Etched Brass
Vehicle: Jeep Willys MB
Parts: Straps, Handles, Grille
Pros
- Amazing detail and craftsmanship
- Perfect companion for Tamiya Jeep kit
- Dresses up the model significantly
Cons
- Some parts are almost microscopic
- Ships in 5 to 6 days
A perfect 5.0-star rating across 10 reviews speaks for itself. This Eduard set is designed for the Tamiya 1/35 Jeep Willys MB, and it provides replacement PE parts for details that are either over-scale in the base kit or missing entirely. Things like strap tie-downs, hood handles, grille mesh, and tiny brackets that add a level of finesse you simply cannot achieve with plastic alone.
Eduard is one of the brands most commonly compared to Aber in forum discussions, and this set shows why. The etching quality is crisp, the parts are well-designed, and the fit with the Tamiya kit is precise. One reviewer called it the “best companion for the Tamiya kit,” and another said it “will really dress up a Jeep model.” Having used Eduard PE on multiple builds, I can confirm that their quality is very close to Aber in terms of brass thickness and detail resolution.
The trade-off is that some parts are genuinely tiny. One reviewer described certain pieces as “almost microscopic in size.” If you struggle with fine motor control or have never worked with PE before, this set will test your patience. I recommend a good pair of spring-loaded tweezers and a head-mounted magnifier for the smallest parts.
Kit Compatibility
This Eduard set (item 35347) is specifically designed for the Tamiya 1/35 Jeep Willys MB kit. While it may physically fit other manufacturers’ Jeep kits, the part sizing and alignment are optimized for Tamiya’s mold. If you are building the Tamiya kit, you can expect excellent fit. For other kits, test-fit each part before committing with glue.
What You Get in the Box
The set includes a single brass fret with approximately 30-40 individual parts covering exterior details, straps, brackets, grille elements, and small hardware items. An instruction sheet shows where each part goes on the kit with clear diagrams. You will need CA glue (super glue) to attach the brass parts to the plastic kit, as standard plastic cement will not bond to metal.
5. Tamiya Cromwell PE Grille Set – Best for British WWII Armor
Tamiya 1/35 Cromwell Photo Etched Grille Model Kit : 35222
Scale: 1/35
Material: Photo-Etched Brass
Vehicle: Cromwell and Centaur
Parts: 5 Grill Pieces
Pros
- Far superior to kit vinyl mesh
- Eliminates cutting and sizing mesh
- Holds paint very well
- Works for Cromwell and Centaur
Cons
- Requires super glue not included
- Small parts need careful handling
Another perfect 5.0-star set, this time aimed at British armor modelers. The Tamiya Cromwell and Centaur kits ship with vinyl mesh for the engine deck grilles, and the process of cutting that mesh to the correct size and shape is a chore. This PE grille set replaces all of that with five precision-etched brass grill pieces that look dramatically better and install much more easily.
What I appreciate about this set is its focused scope. It does one thing and does it perfectly: replace the Cromwell and Centaur engine deck grilles. You get five pieces with clear instructions on exactly where and how to mount each one. A verified reviewer confirmed that the parts “hold paint very well,” which is important because poorly etched brass can sometimes resist paint adhesion. These parts take paint cleanly.
The only requirement is super glue. Because these are metal parts attaching to a plastic kit, standard plastic cement will not work. I recommend a gel-type CA glue applied with a toothpick for precise control. The parts are small, so work in a well-lit area with tweezers. If a part pops off during handling, it can take surrounding paint with it, which is a common frustration mentioned in PE discussions across modeling forums.
Vehicles Supported
This set covers both the Tamiya 1/35 Cromwell Tank and the Centaur Close Support Vehicle. Both kits share the same engine deck layout, so the five PE grilles fit either one without modification. If you build both vehicles, you will need two sets since the parts are single-use.
Installation Walkthrough
Start by removing the vinyl mesh from the kit parts (or simply do not install it). Clean the mounting surfaces with isopropyl alcohol to ensure good glue adhesion. Test-fit each brass grill piece dry before applying any glue. Once you are satisfied with the fit, apply tiny dots of CA glue to the contact points and press the grill into place. Hold for 10-15 seconds. Repeat for each of the five pieces. Prime and paint as normal after all grilles are installed.
6. Tamiya Leclerc Series 2 PE Set – Best for Modern French Armor
Leclerc Series 2 Photo Etch Detail Set 1/35 Tamiya
Scale: 1/35
Material: Photo-Etched Brass
Vehicle: Leclerc Series 2
Parts: Exterior Details
Pros
- Arrives quickly and in good condition
- Provides detail improvements for Leclerc kit
- Well-etched brass construction
Cons
- Limited review data available
- Some users expect more parts for the price
The Leclerc Series 2 is a more niche subject compared to the Abrams or Leopard 2, but for modelers building France’s main battle tank, this Tamiya PE set fills an important role. The set provides exterior detail upgrades in etched brass, primarily focusing on grilles and structural elements that the base kit renders in soft plastic.
At 4.3 stars from 14 reviews, the feedback is positive but limited in volume, which is expected given that fewer modelers build the Leclerc compared to more popular subjects like the Abrams or Tiger. The 70% five-star rating suggests most buyers are satisfied with the parts quality and fit. Reviewers confirm that the set arrived in good condition and provides the detail improvements the Leclerc kit needs.
The lower rating compared to other Tamiya PE sets in our lineup appears to stem from value expectations. Some buyers felt the number of parts included did not match their expectations for the price point. This is worth considering if you are building the Leclerc and want to decide whether this PE set is necessary or if you can achieve good results with careful painting and weathering alone.
What This Set Upgrades
The Leclerc PE set focuses on exterior detail elements: engine deck grilles, side skirt brackets, and various small brackets and fixtures on the hull and turret. If you are displaying the model with hatches open, you may find additional parts for interior-visible details. For a buttoned-up closed-hatch build, the most visible improvements will be the engine grilles and external bracketry.
Is It Worth Adding to Your Build
If you are already investing in a Tamiya Leclerc kit and want the best possible finished result, this PE set is a worthwhile addition. The brass grilles and brackets will be noticeably sharper than the plastic equivalents. However, if you are new to PE work or on a tighter budget, the Leclerc kit actually builds up quite well out of the box with careful painting and weathering techniques.
How to Choose the Right Photo-Etch Set for Your Armor Builds?
Selecting the right photo-etch detail set comes down to three main factors: what vehicle you are building, what scale you work in, and how much PE experience you have. Let me walk through each of these considerations so you can make the right choice on your next build.
Understanding Scale Compatibility
All six sets in our roundup are 1/35 scale, which is the dominant scale for armor modeling and the scale where Aber, Eduard, Tamiya, and other PE manufacturers focus the majority of their product lines. If you build in 1/48 or 1/16, you will need to look for scale-specific sets. Aber does produce some 1/48 and 1/16 PE sets, but availability is limited and you will need to order from specialty retailers.
Within 1/35, compatibility is kit-specific, not universal. A PE set designed for the Tamiya M1A1 Abrams will not fit the Dragon M1A1 Abrams because the two kits have different dimensions and part layouts. Always check the PE set packaging for the specific kit it is designed to fit.
Skill Level: Which PE Sets Match Your Experience
Forum users on FineScale and Reddit consistently describe Aber as “graduate-level” photo-etch. That same level of difficulty applies to some Eduard sets with very small parts. The Tamiya PE sets in our lineup are generally more approachable because they tend to have fewer, larger parts focused on specific areas like grilles and screens.
If you are new to PE work, start with a focused set like the Tamiya Cromwell grille set (5 pieces, straightforward installation) or the King Tiger Zimmerit sheet (adhesive application, no folding required). Save the Eduard Jeep set or complex Aber sets for after you have built confidence with simpler projects.
Essential Tools for PE Work
You do not need expensive equipment to work with photo-etch, but a few specific tools make the process much smoother. First, a quality pair of fine-tip tweezers is non-negotiable. I prefer spring-loaded reverse tweezers that hold the part automatically. Second, you need CA glue (super glue) in both thin and gel consistencies. Thin CA for small contact points, gel for larger flat surfaces. Third, a sharp #11 hobby knife for removing parts from the fret and trimming excess material. Fourth, a PE folding tool or small flat-nose pliers for any parts that need to be bent into shape. Finally, a magnifying lamp or head-mounted magnifier helps tremendously with the smallest parts.
One tool I see beginners skip is a proper cutting surface. A self-healing cutting mat protects both your blades and your work surface. When cutting small PE parts from the fret, the last thing you want is to damage your desk or lose a tiny part because it bounced off a hard surface.
Aber vs Tamiya vs Eduard: Brand Comparison
This is the comparison that comes up constantly in modeling forums, so let me be direct about it. Aber produces the most detailed and comprehensive PE sets. Their part counts are higher, the etching is finer, and the detail resolution is unmatched. However, Aber sets are “graduate-level” in difficulty, with parts that experienced modelers describe as “incredibly fiddly.” They are also only available from specialty hobby shops, not Amazon.
Tamiya PE sets sit at the other end of the spectrum. They are more focused, typically addressing one or two areas of the kit (usually grilles and screens), and the parts are larger and easier to handle. The trade-off is less comprehensive coverage. You will not get the same depth of detail as an Aber set, but you also will not spend hours fishing tiny parts off your workbench.
Eduard occupies the middle ground. Their sets are more detailed than Tamiya’s but not quite at Aber’s extreme level. The etching quality is excellent, and Eduard produces a massive range covering hundreds of different kits. Eduard sets are also available on Amazon, making them the most accessible option for modelers who want Aber-level quality without the specialty retail ordering process.
FAQs
Is photo etch worth it for armor models?
Yes, photo-etch sets are absolutely worth it if you want your armor model to stand out. PE brass parts replace the soft plastic or vinyl mesh that comes in most kits with crisp, scale-accurate metal details. The difference is most visible on engine deck grilles, screens, and fine bracketry where plastic molding simply cannot replicate the thinness and detail of etched brass. For competition-level or display builds, PE is almost essential.
What are photo-etched parts for models?
Photo-etched parts are thin metal components (usually brass) manufactured using a chemical etching process. A design is printed onto a brass sheet, and acid cuts away the unwanted material, leaving behind incredibly fine and detailed parts. These parts include grilles, screens, brackets, straps, handles, and other small details that are too fine to be molded in plastic. Modelers attach them to scale model kits using super glue to achieve a higher level of realism.
How do I apply photo-etch parts to my armor model?
Start by carefully removing parts from the brass fret using a sharp hobby knife. Clean up any attachment tabs with a fine file. Use fine-tip tweezers to position the part on the model. Apply a tiny amount of CA super glue to bond the metal part to the plastic kit. For parts that need folding, use a PE folding tool or small pliers along the etched fold lines. Always test-fit parts dry before applying glue, and work in a well-lit area with magnification.
What is the difference between Aber and Eduard photo-etch sets?
Aber sets are considered the most detailed and comprehensive PE sets available, with extremely fine etching and high part counts. They are described as graduate-level in difficulty and are only available from specialty hobby retailers. Eduard produces excellent quality PE sets with slightly less extreme detail than Aber but much wider availability, including Amazon. Eduard covers a much larger range of kit subjects and is generally more approachable for intermediate builders.
What tools do I need for photo-etch parts?
The essential tools for PE work are: fine-tip tweezers (preferably spring-loaded), CA super glue in thin and gel consistencies, a sharp hobby knife with #11 blades, a PE folding tool or small flat-nose pliers, and a magnifying lamp or head-mounted magnifier. Optional but helpful tools include a cutting mat, a fine-point applicator for glue, and a parts tray to prevent losing small pieces.
Final Thoughts on Photo-Etch Armor Detail Sets
Aber remains the benchmark for photo-etch quality in the scale modeling world, but their products require ordering from specialty hobby shops and demand significant experience to use effectively. For modelers looking for the best Aber photo-etch armor sets alternatives that are available on Amazon with fast shipping, Tamiya and Eduard deliver excellent results in the same 1/35 scale armor niche.
Our top recommendation goes to the Tamiya M1A1/A2 Abrams PE Set for its combination of quality, impact on the finished build, and approachability. For German armor builders, the King Tiger Zimmerit PE sheet is an outstanding value with over 100 positive reviews. And if you want Aber-adjacent quality with Amazon convenience, the Eduard Jeep Willys MB set with its perfect 5-star rating is hard to beat.
Whatever set you choose, remember that patience and the right tools matter more than the brand name on the package. A well-applied Tamiya PE set on a cleanly built model will always look better than a rushed Aber job. Take your time, enjoy the process, and your armor build will thank you for it in 2026.