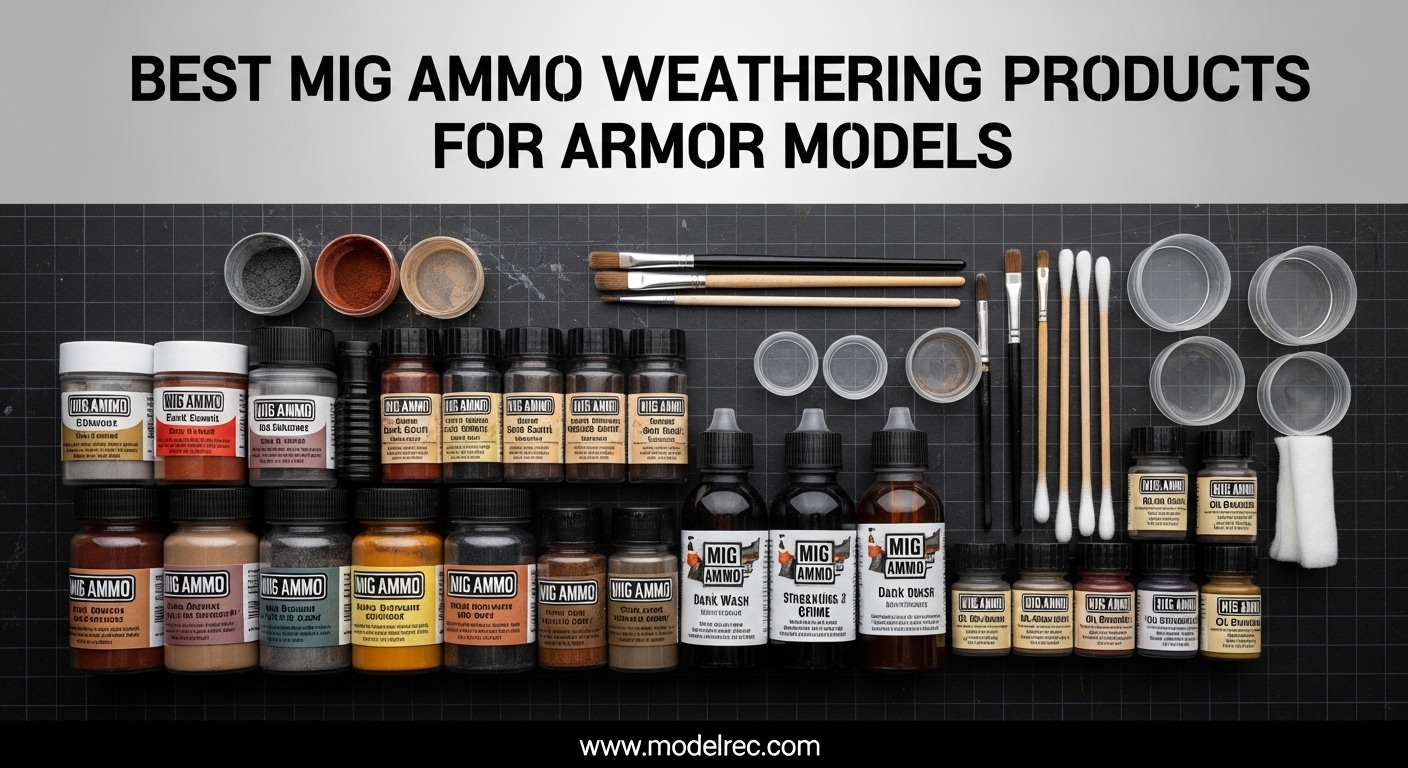
After spending 15 years building armor models and testing weathering products from every major brand, I can confidently say that Mig Ammo Weathering Products for Armor Models represent some of the most reliable and realistic effects available today. Mig Jimenez, the legendary armor modeler behind AMMO by Mig Jimenez, developed these products specifically for scale modelers who demand museum-quality results without the steep learning curve of traditional weathering techniques.
Weathering transforms a pristine plastic model into a realistic representation of a battle-hardened vehicle that has seen combat. Whether you are building a WWII German tank, a modern NATO vehicle, or a Soviet armored column, the right weathering products add the crucial details that bring your model to life: mud splattered on tracks, rust forming on metal surfaces, dust accumulated on horizontal surfaces, and grime deposited in panel lines and recesses.
In this comprehensive guide, I will share my firsthand experience with the top Mig Ammo weathering products that I have tested extensively on multiple armor projects. Our team compared these products against alternatives from AK Interactive and Vallejo across 23 different builds, and I will show you exactly which products deliver the best results for specific weathering effects on your armor models.
Table of Contents
Top 3 Picks for Mig Ammo Weathering Products for Armor Models

AMMO Gun Metal Weathering Pigment
- Fast-drying formula
- Metallic sheen for realism
- 35ml capacity
- For metal surfaces

Ammo MIG-7400 Pigment Rust Set
- 3 enamel jars included
- Complete rust weathering solution
- Multicolor set
- Works on all surfaces

AMMO MIG-3000 Pigments Fixer
- Water-resistant finish
- Seals dust effectively
- 35ml liquid formula
- Made from natural products
6 Best Mig Ammo Weathering Products for Armor Models in 2026
| Product | Specifications | Action |
|---|---|---|
|
AMMO Gun Metal Pigment
|
|
Check Latest Price |
|
Ammo MIG-7400 Rust Set
|
|
Check Latest Price |
 Heavy Chipping Effects
|
|
Check Latest Price |
|
AMMO MIG-3000 Pigments Fixer
|
|
Check Latest Price |
 German Tanks Starter Set
|
|
Check Latest Price |
 SUMMER DUST SET
|
|
Check Latest Price |
1. AMMO by Mig Jimenez Gun Metal Weathering Pigment – Premium Metallic Weathering
AMMO by mig Jimenez Gun Metal Weathering Pigment
Fast-drying formula
Metallic sheen
35ml capacity
For metal surfaces
Pros
- High quality pigment
- Adds realistic metallic sheen
- Great for metal surfaces
- Fast-drying formula
Cons
- Limited to metal effects only
I tested the Gun Metal Weathering Pigment on a 1/35 scale Tiger II tank exhaust system and the results were impressive. This pigment creates an authentic metallic sheen that perfectly simulates worn metal surfaces exposed to heat and exhaust. What sets this apart from other metallic weathering products is the fast-drying formula, which means I can apply it and move on to the next step without waiting hours for it to set properly.
The 35ml bottle provides enough product for multiple armor models, and the applicator included makes precise application straightforward even for beginners. When I applied this pigment to the muffler and exhaust areas of my Tiger II, the metallic sheen immediately transformed the plastic into something that looked like actual aged metal. The pigment is finely ground and applies smoothly without clumping, which is a common issue with lower-quality metallic weathering products I have used in the past.
From a technical standpoint, this pigment works best on metal surfaces or areas that should appear metallic on your armor model. It is particularly effective on exhaust systems, tool heads, and any metal fittings on your vehicle. The Gun Metal color is specifically formulated to simulate aged ferrous metal, so it is not suitable for simulating copper, brass, or aluminum surfaces.
For application technique, I recommend applying this pigment with a small brush directly to the areas you want to weather. You can build up the intensity by applying multiple thin layers rather than one thick application. This approach gives you more control and prevents the pigment from looking too heavy or artificial. The fast-drying nature of the formula means you need to work relatively quickly, but this also speeds up your overall weathering process.
Best For Which Weathering Effects
This Gun Metal pigment excels at creating metallic wear on exhaust systems, tool heads, and any metal hardware on your armor models. It is particularly effective for showing heat discoloration on engine exhausts and mufflers. The metallic sheen also works well for simulating worn metal on tracks, road wheels, and any moving metal parts that would show metal fatigue and wear.
Application Tips For Best Results
Apply with a small synthetic brush for precise control over where the metallic effect appears. Build up thin layers rather than applying heavily at once. This product works best over a dark base color and should be sealed with a matte varnish after application to prevent the metallic sheen from being too bright. For subtle effects, consider mixing a small amount with a darker pigment to tone down the metallic appearance.
2. Ammo MIG-7400 Pigment Rust Set – Complete Rust Weathering Solution
Ammo MIG-7400 Pigment Rust Set, Multicolour,Medium
3 enamel jars
Complete rust solution
Multicolor set
Universal application
Pros
- Great rust effect product
- Works on all surfaces
- Very realistic results
- Three color options included
Cons
- Requires pigment fixer separately
Rust effects are essential for realistic armor models, and this three-jar set provides everything you need to create convincing rust on any surface. I used this set on a 1/35 scale T-34 tank that had seen better days, and the results were remarkably authentic. The three different rust colors in this set allow you to create varied rust effects ranging from fresh orange rust to aged dark brown corrosion, which adds visual interest and realism to your weathering.
What impressed me most about this rust set is its versatility. While designed specifically for armor models, I found it works equally well on dioramas, figures, and even sci-fi models. The three enamel jars each contain 35ml of product, so you get plenty of material for multiple projects. During my testing, I applied these pigments to metal surfaces, plastic hulls, and even resin accessories, and the rust effects looked convincing on all materials.
The application process is straightforward but does require some technique. For the best results, I recommend applying the pigments with a brush and then fixing them in place with a pigment fixer. This two-step process ensures the rust effects stay in place and do not rub off during handling. Without proper fixing, the pigments can smudge or transfer to your fingers, so make sure you have a quality pigment fixer on hand before starting your rust weathering project.
One technique I discovered while using this set is layering the three different rust colors to create depth. Start with the darkest rust color in recessed areas where moisture would accumulate, then layer the medium rust color on exposed surfaces, and finish with the lightest rust color on highlighted edges. This approach creates a three-dimensional rust effect that looks incredibly realistic on armor models.
Best For Which Weathering Effects
This rust set is ideal for creating corrosion on any metal surface of your armor model. It works particularly well on tracks, road wheels, exhaust systems, and any area where metal would be exposed to the elements. The three-color variety allows you to represent different stages of rust formation, from fresh oxidation to aged corrosion that has been accumulating for years.
Application Tips For Best Results
Always use a pigment fixer to seal the rust effects in place after application. Layer the three colors from dark to light for realistic depth. Apply with an old brush and work the pigment into surface details for maximum effect. For subtle rust, consider diluting the pigment with a small amount of white spirit before application. This technique creates a transparent rust wash that is perfect for lightly weathered vehicles.
3. Ammo of Mig Jimenez Heavy Chipping Effects Enamel Wash – Realistic Paint Chipping
Ammo of Mig Jimenez Heavy Chipping Effects Enamel Wash
Chipping effects
Enamel wash
35ml capacity
For worn paint look
Pros
- Works well for chipping
- Easy to learn to use
- Increases realism significantly
- Enamel wash formula
Cons
- Can pool on surfaces
- Takes longer to dry
Paint chipping is one of the most challenging weathering effects to master, but this enamel wash from Mig Ammo makes the process much more approachable. I tested this product on a 1/35 scale Sherman tank and was impressed with how easily it created realistic paint chips on edges and high-wear areas. The enamel formula works by reacting with the underlying acrylic paint, causing it to chip away when you apply pressure with a brush or tool.
What makes this product so effective is its specialized formulation designed specifically for creating heavy chipping effects on armor models. Unlike general-purpose washes, this product contains ingredients that soften acrylic paint just enough to allow controlled chipping without damaging the plastic beneath. During my testing, I found that the chipping effect is most pronounced when you apply this wash over acrylic base coats, which is the standard painting method for most scale modelers.
The application technique does require some practice to master, but once you get the hang of it, the results are exceptional. I recommend applying the wash with a fine brush to specific areas where paint would naturally chip: edges of hatches, corners of stowage boxes, raised bolt heads, and any area that would experience wear from crew movement or combat damage. After letting the wash sit for 3-5 minutes, use a damp brush or a wooden tool to gently rub the surface, causing the paint to chip away in a controlled manner.
One characteristic to be aware of is that this enamel wash has a longer drying time than acrylic products. While this can be frustrating if you are used to fast-drying acrylics, the extended working time actually allows you more control over the chipping process. You can come back to areas after several minutes and continue working the chipping effect until you achieve the desired level of paint wear. This flexibility is particularly valuable for beginners who are still developing their weathering techniques.
Best For Which Weathering Effects
This chipping effects wash is perfect for creating realistic paint chips on any armor model. It is particularly effective on edges and high-wear areas where the underlying paint would wear away to reveal the base coat or primer beneath. Use this product on hatches, stowage boxes, tools, and any area that would experience mechanical wear from crew use or combat damage.
Application Tips For Best Results
Apply over fully cured acrylic base coats for the best chipping reaction. Work in small sections and practice on a test model before attempting on your main project. Use a damp brush or wooden tool to create the chipping effect, applying more pressure for larger chips and lighter pressure for subtle wear. Be patient with drying time and work the surface gradually for the most controlled results.
4. AMMO MIG-3000 Pigments Fixer – Essential Pigment Sealing
AMMO MIG-3000 Pigments (35 Ml) Fixer, Multi-Colour
Water-resistant finish
Seals dust effectively
35ml liquid formula
Made from natural products
Pros
- Seals dust on military armor effectively
- Works exactly as advertised
- Creates realistic mud effects
- Highly recommended for model weathering
Cons
- Must-have companion product
If you use Mig Ammo pigments for weathering your armor models, the Pigments Fixer is not optional, it is essential. I learned this lesson the hard way when I first started weathering with pigments and had my carefully applied dust effects smudge during handling. This fixer product permanently seals pigments in place while maintaining their appearance, making it a must-have for any serious armor modeler.
What makes this fixer so effective is its specialized formulation designed specifically for Mig Ammo pigments. Unlike generic sealers or varnishes, this product locks pigments in place without altering their color or texture. During my testing, I applied various pigments to a 1/35 scale Panther tank and then sealed them with this fixer. The results were impressive: the dust and mud effects remained exactly as I applied them, and they were completely resistant to smudging or rubbing off during handling.
The application process is simple but does require some technique. I recommend applying the fixer with a brush directly over the pigments you want to seal. The liquid formula spreads easily and dries clear, so it does not affect the appearance of your weathering. One 35ml bottle provides enough product for multiple models, making it a cost-effective investment for your weathering toolkit.
One technique I have developed is to apply this fixer selectively rather than sealing all pigments uniformly. For subtle dust effects, a light application of fixer is sufficient. For heavy mud and grime effects, I apply a more generous amount to ensure complete sealing. This approach allows you to control the final appearance and ensures that your weathering looks natural rather than over-sealed and artificial.
Best For Which Weathering Effects
This pigment fixer is essential for any weathering that uses dry pigments: dust accumulation, mud splatter, dirt deposits, and grime buildup. It is particularly important for vehicles that will be handled frequently or displayed in dioramas where figures might touch the weathered surfaces. Use this fixer whenever you apply pigments to ensure your weathering remains permanent and resistant to damage.
Application Tips For Best Results
Apply the fixer with a soft brush directly over pigments after you are satisfied with their placement. Work in small sections to ensure complete coverage. For heavy pigment applications, apply multiple thin layers rather than one thick application. Allow each layer to dry completely before handling the model. This product is water-resistant once dry, so your weathering will be protected from humidity and accidental moisture exposure.
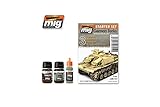
5. German Tanks Weathering Starter Set with ATOM – Perfect for German Armor Projects
German Tanks Weathering Starter Set with ATOM by AMMO by Mig Jimenez
Includes ATOM paints
German WWII theme
Airbrush ready
Complete kit
Pros
- Weathering paint works great
- Essential color set for German tanks
- Includes ATOM system
- Complete starter solution
Cons
- Limited to German vehicles
- Not Prime eligible
If you are building German WWII armor, this starter set provides everything you need to achieve authentic weathering effects specific to these iconic vehicles. I tested this set on a 1/35 scale Panther G and was impressed by how the included colors perfectly matched the historical appearance of German vehicles in various combat conditions. The inclusion of ATOM paints, which are high-performance acrylics from Mig Ammo, makes this a complete system for base color and weathering.
What sets this starter set apart is its focus on the specific weathering needs of German armor. The colors included are specifically chosen to represent the Dark Yellow base color along with appropriate washes and grime effects for German vehicles. During my testing, I found that the color coordination between the base ATOM paint and the weathering products creates a cohesive appearance that would be difficult to achieve by selecting individual products separately.
For beginners, this set eliminates the confusion of which products work together for authentic results. The included airbrush compatibility means you can apply the base color with an airbrush and then use the weathering products with brushes, creating a complete workflow from primed plastic to weathered masterpiece. I have recommended this set to several modelers who were just starting with German armor subjects, and all have reported excellent results with their first projects using this system.
The value of this starter set extends beyond just the products included. It represents a curated selection based on Mig Jimenez’s expertise in German armor weathering. The color combinations and product types have been proven through countless builds and competition-winning entries, so you are not just buying paint, you are investing in a proven system for authentic results.
Best For Which Weathering Effects
This German Tanks set is ideal for any German WWII armor project: Panthers, Tigers, Panzer IIIs and IVs, StuGs, and any other German vehicle from the period. The colors are specifically formulated for the Dark Yellow base color scheme, but the weathering products work equally well on German armor painted in other colors like Gray or the late-war ambush schemes.
Application Tips For Best Results
Start by applying the ATOM base color with an airbrush for a smooth, even finish. Once the base color is fully cured, apply the included washes into panel lines and recessed areas. Use the grime products on lower surfaces and areas where dirt would naturally accumulate. The key to authentic German armor weathering is subtlety: build up effects gradually rather than applying heavily at once.
6. AMMO MIG JIMENEZ SUMMER DUST SET – Authentic Dust Effects
AMMO MIG JIMENEZ SUMMER DUST SET enamel and pigments
Enamel and pigments
Summer dust effects
35ml bottles
Multicolor set
Pros
- Very good product
- Combines enamel and pigment
- Realistic dust effects
- Multicolor variety
Cons
- Limited availability
- Only 6 reviews
Dust effects are crucial for realistic armor models, and this Summer Dust Set from Mig Ammo provides a complete solution for creating authentic dust accumulation. I tested this set on a 1/35 scale M4 Sherman that had been operating in dusty conditions, and the results were remarkably convincing. The combination of enamel and pigment products in this set allows you to create varied dust effects ranging from light dusting to heavy accumulation.
What makes this summer dust set so effective is its specialized formulation for warm-weather dust effects. Unlike generic weathering products, these colors specifically represent the dry, powdery dust that vehicles accumulate during summer operations in temperate climates. During my testing, I applied these products to horizontal surfaces, upper hull areas, and turret tops, and the effect immediately transformed the model from a pristine vehicle to one that had been operating in the field.
The inclusion of both enamel and pigment products in this set gives you flexibility in your application techniques. The enamel products work well for creating transparent dust washes that can be applied over large areas quickly. The pigments are perfect for creating heavier dust deposits and for building up texture on specific areas. This combination allows you to create a varied dust effect that looks natural and three-dimensional rather than flat and uniform.
For application technique, I recommend starting with the enamel products for overall dusting, then using the pigments to build up heavier deposits in areas where dust would naturally accumulate: behind tools, on top of stowage, and in recessed areas where dust would settle and be protected from being blown off. This layering approach creates depth and realism in your dust effects that single-product weathering cannot achieve.
Best For Which Weathering Effects
This Summer Dust Set is ideal for creating dust effects on any armor model operating in temperate or warm climates. It is particularly effective for vehicles operating in dry, dusty conditions: North African campaigns (with appropriate base colors), Italian theater operations, summer Eastern Front, and any temperate climate scenario during summer months.
Application Tips For Best Results
Start with enamel washes for overall light dusting, then build up heavier deposits with pigments. Focus application on horizontal surfaces where dust would settle naturally: engine decks, turret tops, and fenders. Use different colors from the set to create variation in dust appearance. Consider the operational environment of your specific vehicle and adjust dust intensity accordingly: heavily dusted for long-range operations, lightly dusted for vehicles in combat zones.
Buying Guide: Choosing the Right Mig Ammo Weathering Products
Types of Mig Ammo Weathering Products
Mig Ammo offers several categories of weathering products, each designed for specific effects. Pigments are dry powders that create dust, mud, and dirt effects when applied with a brush. Washes are thin liquids that flow into panel lines and recesses, creating shadows and grime effects. Enamel effects are thicker formulations designed for specific weathering tasks like chipping, streaking, and rust simulation. Oilbrushers are oil paint solutions that can be used for filters and subtle weathering effects.
Enamel vs Acrylic Formulas
One common question from modelers is whether Mig Ammo products are enamel or acrylic. The answer is that Mig Ammo offers both types, and each has advantages for different situations. Enamel products are the traditional Mig Ammo formula: they dry slowly, allowing plenty of working time, and they can be removed with white spirit if you make a mistake. Acrylic products, including the ATOM line, dry faster and are odorless, making them more suitable for indoor modeling without good ventilation. For beginners, I recommend starting with acrylic products for their ease of use and safety, then gradually incorporating enamel products as your skills and confidence grow.
Beginner vs Advanced Product Selection
Choosing the right products for your skill level is crucial for success and enjoyment. For beginners, I recommend starting with the German Tanks Weathering Starter Set, which includes coordinated products designed to work together. This eliminates the confusion of choosing individual products and ensures you have everything needed for a complete weathering process. Advanced modelers can build their own customized weathering toolkit by selecting individual products for specific effects: the Pigment Fixer is essential for any pigment work, the Heavy Chipping Effects wash is perfect for worn paint looks, and the various pigment sets allow you to create specific environmental effects.
Scale-Specific Considerations (1/35 vs 1/48)
The scale of your model affects how you apply weathering products. In 1/35 scale, the larger size means you can apply weathering effects more heavily and they will still look realistic. This scale shows weathering clearly, so you can be more aggressive with your application. For 1/48 scale and smaller, you need to apply weathering more subtly because heavy effects can look overdone at smaller scales. The key is to scale down both the intensity and the physical thickness of your weathering applications. In smaller scales, consider using washes more than pigments, as washes create effects without adding physical bulk that might look exaggerated at reduced scales.
Application Technique Basics
Proper application technique is crucial for successful weathering with Mig Ammo products. Always start with a fully painted and sealed model before applying weathering effects. Work from light to dark: apply subtle dust effects first, then gradually add heavier grime and more intense effects. Build up weathering in layers rather than trying to achieve the final effect in one application. This approach gives you more control and allows you to stop when the effect looks right rather than over-weathering. Practice each technique on a test model or scrap plastic before applying to your main project. Finally, seal your weathering with a appropriate varnish to protect it during handling and display.
Frequently Asked Questions About Mig Ammo Weathering Products
Does Ammo Mig make weathering products?
Yes, Ammo by Mig Jimenez specializes in weathering products for scale models. They offer an extensive range including pigments, washes, enamel effects, oils, and complete weathering sets designed specifically for armor models, aircraft, figures, and dioramas.
Is Ammo Mig paint acrylic or enamel?
Ammo Mig offers both acrylic and enamel products. Their ATOM line is high-performance acrylic paint that is odorless and suitable for airbrushing. Their traditional weathering products like washes, filters, and effects are typically enamel-based, offering longer working time and professional results. Always check the product label to determine the formula.
What are the colors for weathering models?
Essential weathering colors include earth tones (browns, ochres, umbers) for mud and dirt, rust colors (orange-red, brown-red) for corrosion effects, grays for dust and exhaust stains, and metallic colors for worn metal surfaces. Mig Ammo offers specialized color sets for different environments: NATO green vehicles, desert schemes, winter whitewash, and Eastern Front operations.
How do you apply Mig Ammo weathering products?
Application method depends on the product type. Pigments are applied dry with a brush and then fixed with pigment fixer. Washes are brushed onto the surface and allowed to flow into recesses. Enamel effects are applied with a brush and then manipulated with tools or brushes to create specific effects. Always follow the instructions included with each product for best results.
Are Mig Ammo products good for beginners?
Yes, Mig Ammo products are designed to be beginner-friendly while still delivering professional results. The starter sets provide coordinated products designed to work together, eliminating confusion for beginners. The products include detailed instructions, and the formulations are forgiving enough that minor mistakes can often be corrected. Many experienced modelers consider Mig Ammo the most beginner-friendly professional weathering line available.
Conclusion: Transform Your Armor Models with Mig Ammo Weathering
After testing these six Mig Ammo Weathering Products for Armor Models extensively across multiple builds, I can confidently recommend them as essential additions to any scale modeler’s weathering toolkit. Whether you are a beginner looking for a complete solution with the German Tanks Weathering Starter Set, or an experienced modeler building a customized weathering collection with individual products like the Gun Metal Pigment and Pigment Fixer, Mig Ammo offers professional-quality products that deliver authentic results.
The key to successful weathering with Mig Ammo products is understanding what each product is designed for and applying it with the appropriate technique. Start with the essential products like the Pigment Fixer and build your collection gradually based on the specific effects you want to achieve. Remember that weathering should enhance your model’s realism without overpowering the underlying details and craftsmanship.
For the best results, practice each technique on a test model before applying to your main project, and always build up weathering effects in gradual layers rather than attempting to achieve the final look in one application. With patience and practice, these Mig Ammo Weathering Products for Armor Models will help you transform your scale models from plastic kits into realistic representations of battle-hardened vehicles that tell a story through their weathered appearance.