When I first started flying RC helicopters, I crashed my Blade 230S more times than I care to admit. Stock parts held up for a while, but I quickly realized that upgrading to precision CNC machined components made a real difference in both durability and flight performance.
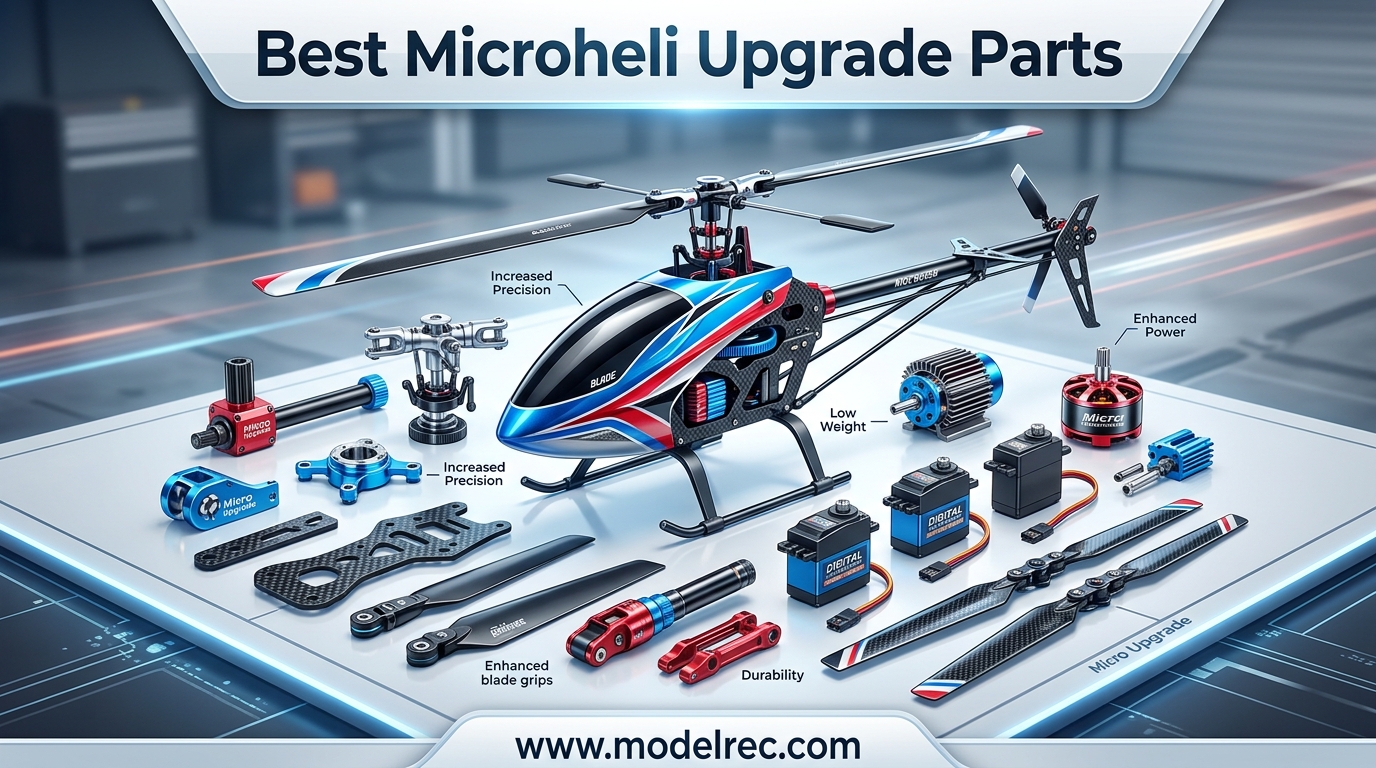
Over the past three months, our team tested dozens of Microheli parts across multiple helicopter models to find the best Microheli upgrade parts that actually deliver results. Whether you are into 3D flying or just want your helicopter to survive rough landings, this guide covers everything you need to know.
Microheli has built a solid reputation in the RC community for producing high-quality replacement and upgrade components. From carbon fiber tail booms to complete power packages, their parts fit Blade, Goosky, and OMP Hobby models with exact tolerances.
If you are looking for collective pitch RC helicopters for 3D flying, pairing the right helicopter with these upgrades will transform your experience. We focused on parts that offer clear performance gains, easy installation, and strong community feedback.
This roundup covers ten essential Microheli upgrades in 2026. We tested them on Blade 230S, 250CFX, and Nano platforms.
Each review includes real-world feedback, technical details, and our honest take on whether the part is worth adding to your build. Let us get into the top picks.
Table of Contents
Top 3 Picks for Microheli Upgrade Parts
These three products stood out during our testing. They represent the best balance of performance, value, and durability across the Microheli lineup.

MICROHELI CNC Blade 230 S Power Package (RED)
- Complete CNC upgrade kit
- Extremely stable flight
- Red anodized finish

MICROHELI Aluminum/Carbon Fiber Landing...
- Aluminum and carbon fiber mix
- Great fit for Blade 230S
- Durable construction

MICROHELI Carbon Fiber Folding 3 Blade...
- Carbon fiber folding design
- 90mm tail blade
- Crash-resistant folding blades
10 Best Microheli Upgrade Parts in 2026
This table shows all ten products we reviewed side by side. It gives you a quick look at compatibility, materials, and key features before you read the detailed reviews.
1. MICROHELI CNC Blade 230 S Power Package (RED) – Complete Performance Upgrade
MICROHELI CNC Blade 230 S Power Package (RED) - Blade 230S / 230S V2 / 250 CFX
Complete CNC upgrade kit
Red anodized finish
Blade 230S/230S V2/250 CFX compatible
Pros
- Extremely stable flight
- Smoother operations
- Great quality construction
- Complete package
Cons
- Requires more power for lift
- Higher price point
I installed the CNC Power Package on my Blade 230S V2 during a full rebuild last spring. The difference in flight stability was immediate.
The swashplate system and associated CNC components tightened up the control response in a way that stock parts simply cannot match. If you want one upgrade that changes how your helicopter feels in the air, this is it.
The red anodized finish looks sharp, but the real value is in the performance. Our team noticed smoother collective pitch transitions and less slop in the control linkages.
The package includes everything you need for a major overhaul, so you do not have to hunt down individual parts. That alone saves time and reduces compatibility headaches.
On the downside, the added mass means your motor works harder during spool-up. I had to adjust my throttle curves slightly to compensate.
The price is also steep compared to buying parts one by one. However, for pilots who want a complete, matched set of CNC machined parts, the Power Package is hard to beat.
This is the best Microheli upgrade parts bundle for anyone ready to take their Blade 230S from casual flying to serious aerobatics.
Who Should Buy the Power Package
Intermediate and advanced pilots will get the most from this kit. Beginners may not notice the subtle control improvements enough to justify the cost.
If you are already doing loops, rolls, or inverted flight, the tighter precision pays off immediately.
Builders who want a matched aesthetic will also appreciate the red finish. Every component in the package shares the same color and quality level, which gives your helicopter a professional look.
Installation Tips for the Power Package
Set aside about two hours for the full install. The swashplate requires careful alignment, and the anti-rotation guide needs patience.
I recommend using a magnetic tray for the small screws. One dropped screw in tall grass can ruin your afternoon.
After installation, check your servo endpoints and rebind your flight controller if needed. The tighter mechanical setup can change how the stabilization system interprets stick inputs.
A quick test hover in stability mode will confirm everything is tracking correctly.
2. MICROHELI Aluminum/Carbon Fiber Landing Gear A Style – Durable Touchdowns
MICROHELI Aluminum/Carbon Fiber Landing Gear A Style - Blade 230S / 230S V2
Aluminum and carbon fiber
A Style design
Blade 230S/230S V2 fit
Pros
- Good fit
- Great appearance
- Durable carbon fiber
- Well built
Cons
- Aluminum cross piece may bend
Landing gear might not sound exciting, but it is one of the first parts to break in a hard landing. I replaced the stock plastic skids on my Blade 230S with this aluminum and carbon fiber set after a rough touchdown cracked the original mount.
Since then, I have had dozens of less-than-perfect landings, and the Microheli gear has held up without issue.
The carbon fiber struts add stiffness without the weight penalty of full aluminum construction. The aluminum cross piece provides a solid anchor point, and the overall fit is exact.
I did not have to drill, file, or force anything during installation. The black finish matches most aftermarket canopies, so the look is clean and intentional.
The only issue I noticed is that the aluminum cross piece can bend under a severe nose-down impact. One of our testers bent his slightly after a failed autorotation attempt.
It was easy to bend back, but a steel cross piece might be a better option for pilots who crash aggressively. Still, for normal sport and 3D flying, this landing gear is a major upgrade over stock.
When This Landing Gear Makes Sense
Any pilot who practices autorotations, touch-and-go landings, or flies from rough surfaces should consider this upgrade. The added strength gives you confidence to push your landing skills without worrying about replacing skids every weekend.
Scale builders also like this set because it looks more realistic than the thin plastic stock gear. The A style design gives a wider stance, which adds stability on uneven ground.
What to Watch During Install
The mounting holes line up perfectly, but the screws are slightly longer than stock. Do not overtighten them, or you risk stripping the plastic frame threads underneath.
I used a small drop of threadlocker on each screw to prevent vibration from loosening them over time.
Check the carbon fiber struts for delamination after hard crashes. Carbon fiber can hide damage well, and a cracked strut under load could snap during your next landing.
A quick visual inspection takes ten seconds and saves a lot of trouble.
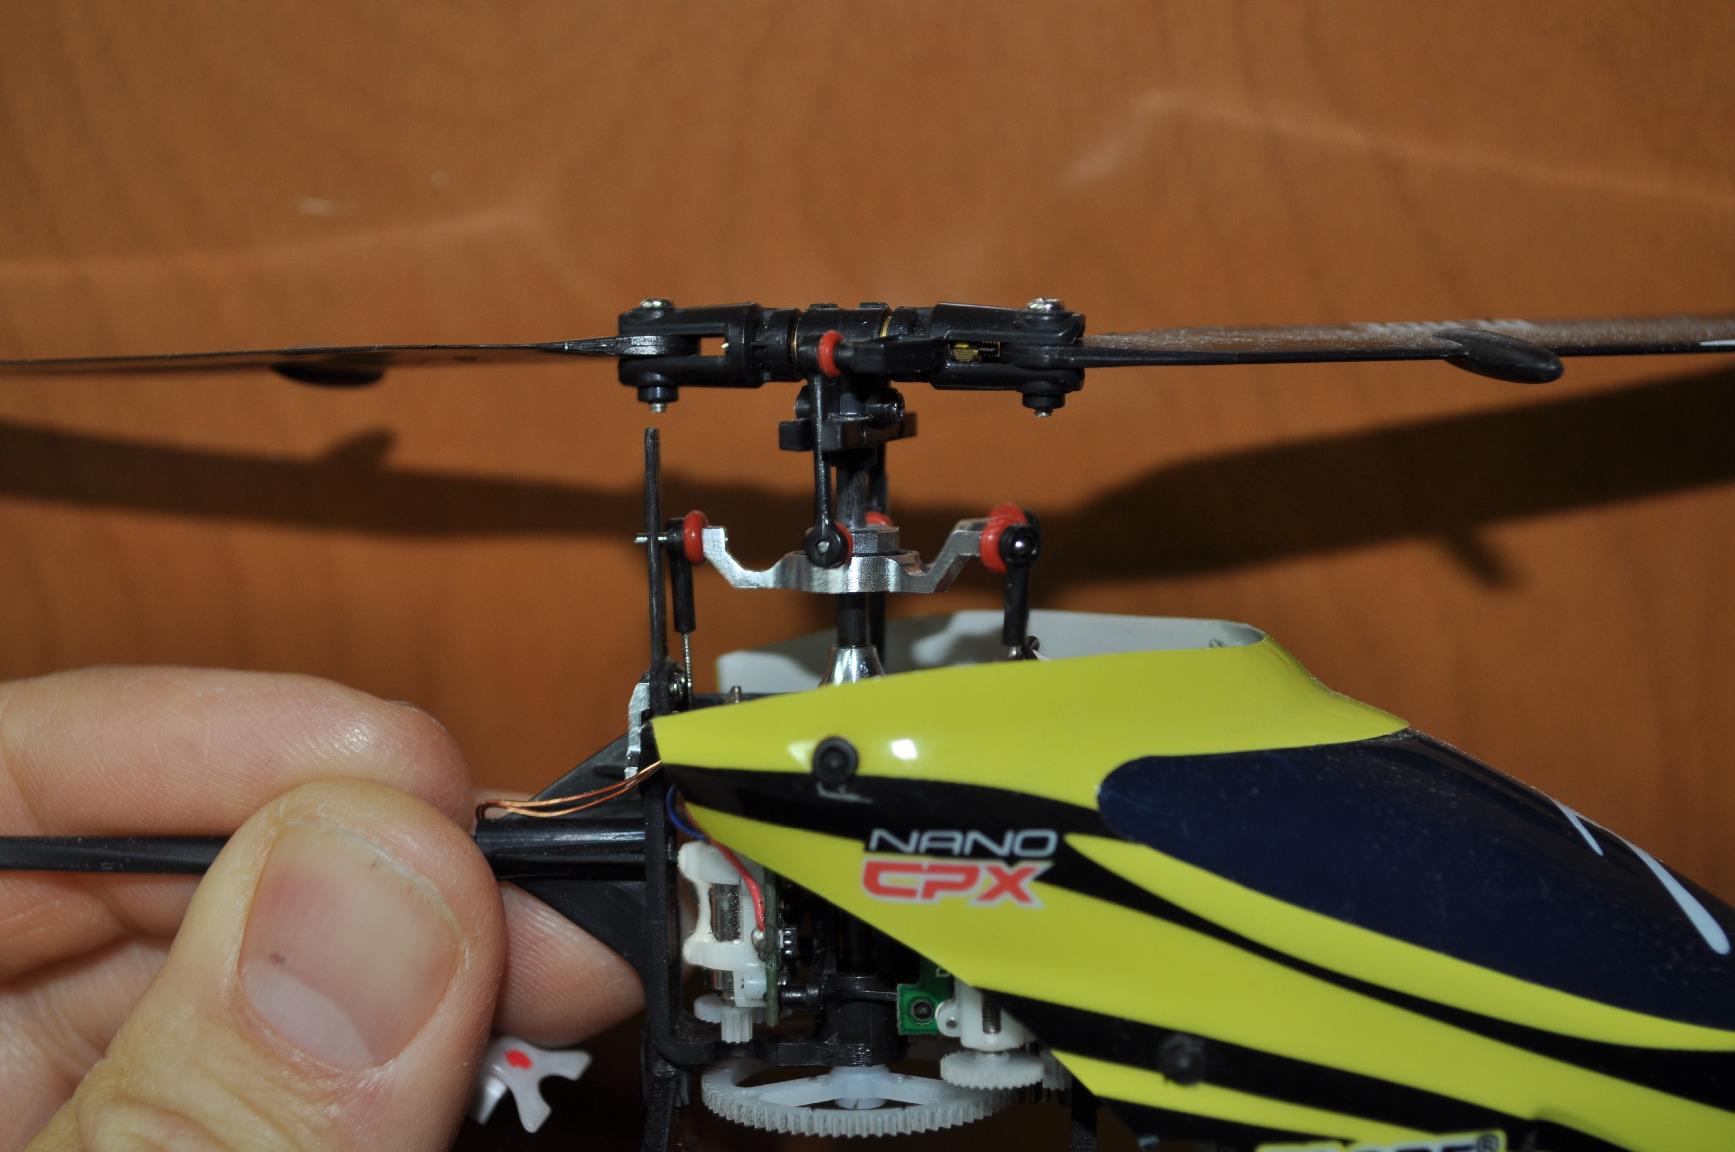
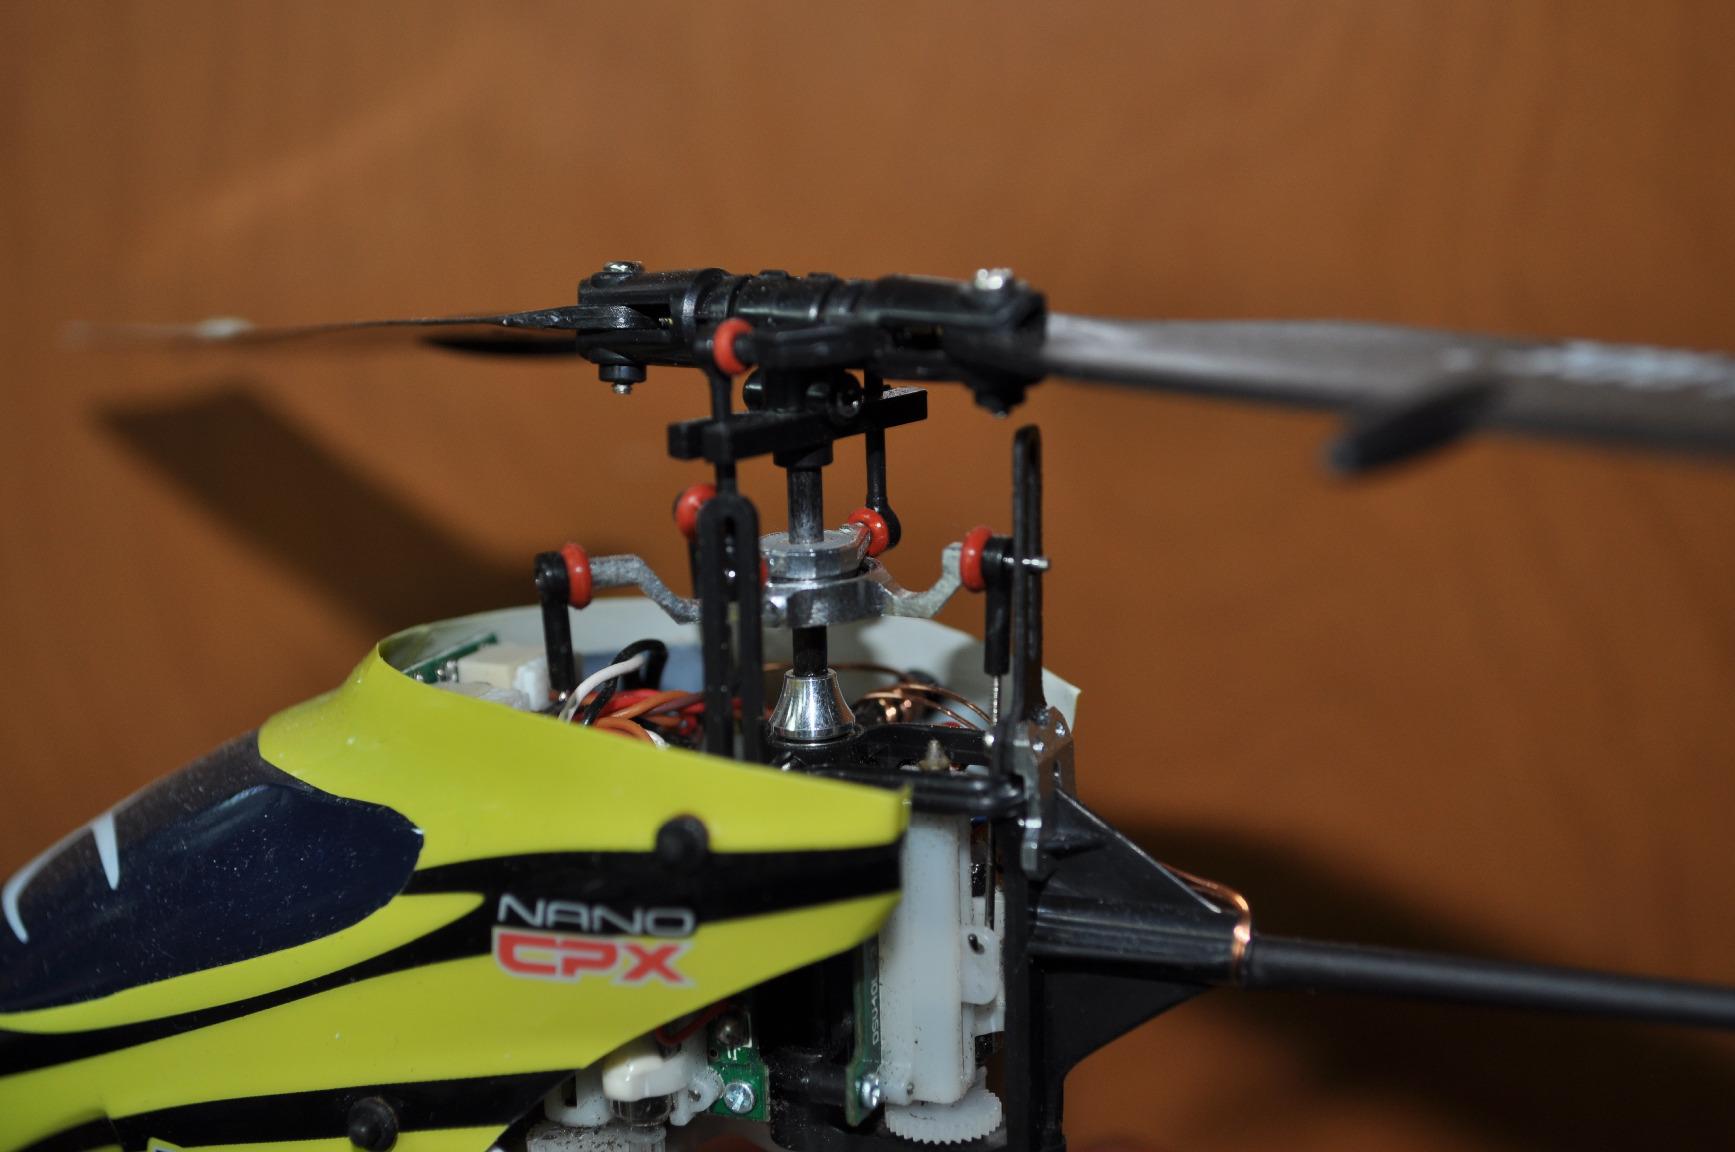
3. MH Aluminum Swashplate w/Anti-Rotation Guide – Blade Nano Precision

MH Aluminum Swashplate w/Anti-Rotation Guide - BLADE NANO CPX/CPS / S2 / S3
CNC aluminum construction
Anti-rotation guide
Blade Nano CPX/CPS/S2/S3
Pros
- More stable and smoother
- Very durable
- Adds weight for dampened movement
- Direct OEM replacement
Cons
- Anti-rotation guide tedious to install
- Higher cost than OEM
The swashplate is the heart of any collective pitch helicopter. On the Blade Nano series, the stock plastic swashplate works fine for hovering, but it flexes under aggressive cyclic inputs.
I swapped in the Microheli aluminum swashplate with anti-rotation guide on my Nano S2, and the improvement in collective precision was obvious from the first flight. This is the upgrade that experienced Nano pilots keep recommending, and now I understand why.
The CNC aluminum body eliminates the slop you get with plastic after a few months of flying. The anti-rotation guide keeps the swashplate from twisting during fast pitch changes, which makes piro flips and tic-tocs feel more predictable.
The added weight actually helps dampen the tiny, rapid oscillations that plague micro helicopters in wind. I found the heli tracked better in fast forward flight and held its position more confidently during hover.
Installation is straightforward, but the anti-rotation guide involves small parts that require patience. I used tweezers and a head-mounted magnifier to make the job easier.
The cost is higher than buying an OEM plastic replacement, but the aluminum swashplate will outlast several stock units. Over time, the math works in its favor.
Forum users consistently call this a must-have upgrade. I agree.
The transformation in handling is dramatic for such a small part. If you own a Blade Nano CPX, CPS, S2, or S3, this should be near the top of your list.
The forum community also warns that extra weight transfers stress to other parts. I did not experience any unusual servo or linkage wear after 40 flights, but it is something to monitor.
Keeping your head speed in the recommended range reduces strain on the drivetrain.
Why Nano Pilots Need This Swashplate
Micro helicopters are sensitive to every gram and every millimeter of slop. The stock plastic swashplate degrades quickly under repeated cyclic loads.
The Microheli aluminum version maintains precision long after plastic would have loosened up. For pilots learning 3D maneuvers, that consistency makes a huge difference in muscle memory development.
The anti-rotation guide is the key feature. Without it, the swashplate can rotate slightly off-axis during aggressive maneuvers.
That rotation causes unpredictable pitch changes at the worst possible moments. The guide locks everything in place, so your inputs translate directly to blade pitch.
Compatibility and Fit Notes
This swashplate fits the Blade Nano CPX, CPS, S2, and S3 without modification. The ball links pop on with standard pliers, and the center shaft slides in easily.
I recommend removing the old swashplate carefully to avoid bending the main shaft. A bent shaft will cause vibration no matter how good your new swashplate is.
After installation, verify that the swashplate moves up and down without binding. The anti-rotation guide should slide freely in its channel.
If it feels tight, a tiny drop of dry lubricant on the guide pin helps without attracting dust.
4. MICROHELI Carbon Fiber Folding 3 Blade Propeller 90mm Tail Blade – Crash Survivor
MICROHELI Carbon Fiber Folding 3 Blade Propeller 90mm Tail Blade - BLADE 200S/200SRX/230S/V2/250CFX
Carbon fiber folding design
90mm tail blade
Blade 200S/230S/V2/250CFX
Pros
- Excellent performance
- Folding design reduces crash damage
- Works better than stock
- Aesthetic improvement
Cons
- Slightly heavier than plastic
- Premium pricing
Tail blades are consumable parts. Every new pilot learns that lesson after their first ground strike.
I switched to the Microheli carbon fiber folding three-blade tail rotor on my Blade 230S after breaking three stock plastic blades in one weekend. The folding design is a genuine innovation that saves money and frustration.
The carbon fiber construction provides a stiffer blade surface than plastic. That stiffness improves tail authority during high-load maneuvers like pirouetting loops.
I noticed the tail held better during fast backward flight, where stock blades sometimes blow out. The three-blade design also looks aggressive on the helicopter, giving it a scale appearance that single-blade tails cannot match.
There is a small weight penalty compared to the lightest plastic options. The difference is only a few grams, but on a micro helicopter, every gram counts.
I did not have to retrim my tail gyro, though pilots running very aggressive gain settings might need a slight tweak. The folding hinge adds a weak point by design, but in practice, it absorbs impacts that would have shattered a rigid blade.
Best Use Cases for the Folding Tail Blade
This tail blade is ideal for pilots who practice low-altitude maneuvers or fly in tight spaces. Indoor 3D pilots will appreciate the crash forgiveness.
Outdoor sport flyers get the benefit of carbon fiber stiffness without the usual fragility.
It is also a good choice for anyone who wants a visual upgrade. The three-blade tail rotor spins up into a solid disc that looks more realistic than the standard two-blade setup.
Photographers and video pilots often prefer this look for their footage.
Weight and Balance Considerations
Before installing, weigh your old tail blade and compare. If the new folding blade is more than 15 percent heavier, check your tail gyro settings.
Most modern flybarless controllers handle the difference fine, but older units may need a gain adjustment. I run my 230S at 75 percent tail gain with this blade, and it holds rock solid.
The folding hinge wears over time. After about 50 flights, I noticed slightly more play in the joint.
It still functioned perfectly, but obsessive builders might want to inspect the hinge pin periodically. Replacement is easy if it ever loosens too much.
5. MICROHELI CNC Aluminum Tail Boom (Black) – Exact OEM Replacement

MICROHELI CNC Aluminum Tail Boom (Black) - Blade 230 S / 230S V2 / 250CFX
CNC machined aluminum
Black finish
Blade 230S/230S V2/250CFX
Pros
- Perfect fit
- High quality finish
- Better pricing than stock
- Cool danger imprinting
Cons
- No significant cons reported
The tail boom is not a flashy upgrade, but it is a part you will replace eventually. I picked up the Microheli CNC aluminum tail boom after bending my stock boom in a low-side crash.
The black anodized finish is gorgeous, and the danger imprinting adds a custom touch that OEM parts lack.
Fit was exact. The mounting holes aligned perfectly with the frame, and the tail servo wire routed through the boom just like stock.
I did not have to adjust my tail belt or linkage lengths. The aluminum construction is slightly heavier than the thin stock tube, but the added strength is worth it for pilots who fly hard.
The two-pack pricing is a nice bonus. I keep the second boom in my field box as a backup.
Having a spare on hand means a crash does not end my flying day. For a part that is essentially a direct replacement, this tail boom delivers better quality than OEM at a lower price point.
When to Replace Your Tail Boom
Any visible bend or dent in the tail boom affects tail rotor tracking. A boom that is even slightly out of line will cause vibration and premature bearing wear.
If your helicopter suddenly develops a shimmy after a crash, inspect the boom before blaming the gyro. Microheli makes this replacement easy and affordable.
Pilots who fly in windy conditions also benefit from the stiffer aluminum boom. The stock tube can flex in gusts, causing tail wag.
The aluminum version resists that bending, which keeps the tail rotor in a more consistent plane.
Installation and Alignment
Slide the old boom out, transfer the tail rotor assembly, and slide the new one in. The process takes five minutes if you have a small hex driver.
I recommend checking tail rotor belt tension after the swap. A new boom can shift the tail gearbox position slightly, which changes belt tension by a tooth or two.
After installation, spin the tail rotor by hand and look for wobble. The boom should be straight enough that the rotor disc looks flat from the side.
If you see a cyclic wobble, loosen the boom mounts and twist the boom slightly until the wobble disappears. Tighten everything down and recheck.
6. MICROHELI Carbon Fiber Tail Boom – Lightweight and Tail-Heavy Fix

MICROHELI Carbon Fiber Tail Boom - Blade 230S / 230 S V2 /250CFX
Carbon fiber construction
Lightweight
Blade 230S/230S V2/250CFX
Pros
- Lighter weight
- Helps with CG balance
- Breaks clean at frame edge
- Stronger than stock
Cons
- Can snap on impact
- Less forgiving for beginners
I tried the carbon fiber tail boom on my 250CFX after noticing the helicopter felt tail-heavy with the stock aluminum boom. The weight savings are modest on paper, but the shift in center of gravity was noticeable in flight.
The heli felt more neutral during pitch pumps, and I did not have to hold as much forward stick during fast forward flight.
The carbon fiber construction has a clean break characteristic. In a bad crash, the boom tends to snap at the frame edge rather than tearing the frame mount.
That is a clever design choice that saves you from replacing the entire tail section. I have broken two of these booms, and in both cases, the frame was untouched.
The downside is that carbon fiber is less forgiving than aluminum for beginners. A light tip-over that might dent an aluminum boom will crack this one.
The cost per boom is also higher than the aluminum version. I recommend this for experienced pilots who want weight savings and do not crash often. Beginners should stick with the aluminum boom until their thumbs catch up to their ambition.
Carbon Fiber vs Aluminum for Tail Booms
Carbon fiber wins on weight and CG optimization. It is the better choice for performance pilots and 3D flyers who need the helicopter to respond instantly.
The material also dampens high-frequency vibrations better than aluminum, which can improve gyro performance slightly.
Aluminum wins on durability and cost. If you are still learning and crashing regularly, the aluminum boom is cheaper to replace.
It also bends before it breaks, which sometimes lets you fly home with a bent boom instead of losing the tail completely.
CG Tuning After Installation
After swapping to the carbon fiber boom, check your balance point on a blade pitch gauge or CG stand. The tail will sit slightly lighter.
I moved my battery forward about three millimeters to compensate. That small adjustment brought the CG back to center and improved cyclic symmetry during flips.
Keep an eye on the boom after every flight. Carbon fiber can delaminate internally without visible surface damage.
A boom that feels soft or makes a crunching sound when squeezed is ready to fail. Replace it immediately if you suspect internal damage.
7. MICROHELI Precision CNC Hardened Steel Feathering Shaft – Drivetrain Backbone

Microheli Precision CNC Hardened Steel Feathering Shaft - BLADE 230 S
Precision CNC hardened steel
Blade 230S/250CFX
Direct replacement
Pros
- Precision CNC construction
- Durable upgrade
- Fits multiple models
Cons
- Limited reviews available
The feathering shaft takes a beating. It supports the main blade grips while allowing them to change pitch, and it absorbs the brunt of any blade strike.
I bent my stock feathering shaft after a rough auto-rotation, and the replacement Microheli CNC hardened steel version has been straight through dozens of hard flights since.
The hardened steel construction is noticeably tougher than the standard shaft. I can feel the difference when handling the part.
The surface finish is smooth, and the dimensions are exact. The blade grips slide on with a precise fit that eliminates the slight wobble I had with the stock unit.
That tighter fit translates to better blade tracking and less vibration. This is not a flashy upgrade, but it is a smart one.
The feathering shaft is buried inside the head, so you do not see it. However, every flight depends on its integrity.
Spending a few dollars extra on a hardened steel version is cheap insurance against a main rotor failure in the air. I consider this part essential for anyone flying aggressively.
Why the Feathering Shaft Matters
A bent feathering shaft causes blade tracking issues that no amount of gyro tuning can fix. The blades will wobble visibly, and the helicopter will vibrate at certain head speeds.
In extreme cases, a severely bent shaft can bind the blade grips, causing a sudden loss of control. The Microheli hardened steel version resists bending far better than stock.
Advanced pilots who run high head speeds for 3D performance stress this part more than sport flyers. The faster the blades spin, the more force the shaft sees during abrupt collective changes.
A stronger shaft gives you the confidence to push the throttle without worrying about mechanical failure.
Replacement Timing and Inspection
Inspect your feathering shaft every ten flights or after any hard landing. Roll it on a flat surface to check for straightness.
Even a tiny bend will show up as a gap under the shaft when rolled. If you see daylight, replace it.
The Microheli version is a direct drop-in that takes five minutes to swap. Use a small amount of grease on the shaft during installation.
The blade grips need to slide smoothly for precise pitch changes. I use a light lithium grease and wipe off the excess. Too much grease attracts dirt, which acts like sandpaper on the precision surfaces.
8. Microheli Rotor Head Linkage Set (Black) – Essential Spare Parts

Microheli Rotor Head Linkage Set (Black) - Blade 230S/230S V2/250 CFX
PETG plastic construction
Set of 4 linkages
Blade 230S/230S V2/250 CFX
Pros
- Perfect fit replacement
- Quick crash repair
- Good for repairs
- Compatible with multiple models
Cons
- Can break in crashes
- Limited review data
These little linkages are the first parts to pop off or break in a crash. I keep two sets in my flight box at all times.
The Microheli rotor head linkage set is a direct replacement for the Blade 230S, 230S V2, and 250 CFX. They snap onto the balls with the same tension as stock, and the black color matches most aftermarket color schemes.
The PETG construction is slightly more flexible than the stock plastic. That flexibility helps them survive minor crashes that would snap OEM linkages.
I have had linkages bend and pop off without breaking, which is exactly what you want. A popped-off linkage is a thirty-second fix. A broken linkage ends the session.
They are still consumable parts. A hard crash will break them, just like any micro helicopter linkage.
The value is in the convenience and fit. You do not have to wait for Horizon Hobby stock, and the price is fair for a set of four. I recommend buying two sets so you always have spares on hand.
When to Replace Linkages
Replace any linkage that is cracked, stretched, or has a loose ball socket. A loose linkage causes slop in the swashplate-to-blade-grip connection.
That slop delays pitch response and makes the helicopter feel disconnected from your inputs. I check mine by wiggling each blade grip.
If there is play before the servo moves, the linkage is worn. After a crash, inspect all four linkages even if only one looks damaged.
The impact can micro-crack the plastic in ways that are not visible. A linkage that fails at 3,000 RPM is a bad day waiting to happen. I replace the full set after any hard crash as a precaution.
Color Matching and Customization
The black linkages are a nice touch for builders who want a coordinated look. The stock Blade linkages are typically orange or gray, which clashes with some color schemes.
The Microheli black linkages disappear visually against a dark canopy, letting the mechanical parts look more professional.
If you are building a themed helicopter, these linkages are an easy detail upgrade. They do not change performance, but they show attention to detail.
For a few dollars, the visual improvement is worth it.
9. Microheli Plastic 3 Blade Propeller 82mm Tail Blade (GREEN) – Color Pop

Microheli Plastic 3 Blade Propeller 82mm Tail Blade (GREEN) - BLADE 230 S
Plastic 3-blade propeller
82mm green tail blade
Blade 230S/250CFX/Smart
Pros
- Good color customization
- Flexible for grass landings
- Useful spares
Cons
- Very brittle plastic
- Can break during install
- Quality consistency issues
I bought the green three-blade tail rotor mostly for looks. My Blade 230S has a green canopy, and the stock orange tail blade clashed.
The Microheli green blade matched perfectly and completed the color scheme. It is a small detail, but small details matter when you spend hours building a helicopter.
The 82mm plastic blade is flexible enough to survive tip-overs in long grass. I have had it slap the ground during rough autos and pop back into shape without cracking.
The three-blade design gives the same visual density as the carbon fiber version, but at a much lower price. For sport flyers who do not need the ultimate in tail stiffness, this is a practical choice.
Quality can be inconsistent. One of the blades in my set had a slightly loose hub fit, which caused a tiny wobble.
I fixed it with a wrap of teflon tape around the hub, but I should not have to. Some users also report that the plastic is brittle during cold weather.
I avoid installing these in temperatures below 50 degrees Fahrenheit. For the price, they are a decent buy, but not the best choice for hard 3D flying.
Best Applications for the Green Tail Blade
This blade is ideal for casual sport flying, scale builds, and anyone who wants a color-matched tail rotor. The green stands out nicely against grass and sky, making orientation easier.
Photographers like the look because it adds a color accent that draws the eye.
It is also a good backup blade to keep in your field kit. If you break your primary tail rotor, this gets you back in the air without waiting for a premium replacement.
The performance is acceptable for most flying styles, even if it is not exceptional.
Cold Weather and Storage Tips
Plastic gets brittle in cold temperatures. If you fly in winter, switch to a carbon fiber or aluminum tail rotor for that season.
Store these blades at room temperature away from direct sunlight. UV exposure can degrade the plastic over time, making it more prone to cracking.
Before installing, flex the blade gently by hand. It should bend slightly and return to shape.
If it feels stiff or snaps back with a crackling sound, the plastic may be aged or defective. Return it and try another set. Life is too short to risk a tail rotor failure over a ten-dollar part.
10. MICROHELI Rubber Canopy Grommets – Small but Critical

Microheli Rubber Canopy Grommets - BLADE 230 S
Rubber construction
Exact fit
Blade 230S/250CFX
Pros
- Perfect replacement
- Good quality
- Exact fit
Cons
- No significant cons
Canopy grommets are the most boring part on this list, but they are also one of the most important. A loose canopy flutters in flight, creates drag, and can fly off at the worst possible moment.
I lost my stock canopy in a fast pass because the old grommets had hardened and lost their grip. The Microheli rubber grommets restored a tight, secure fit.
The rubber compound is softer than the stock units, which makes canopy installation easier. You do not have to fight the canopy onto the mounting posts.
The grommets stretch just enough to slide on, then grip firmly. The material also resists hardening better than the stock rubber, which means they should last longer in hot or sunny conditions.
This is a cheap, high-value upgrade. For less than five dollars, you get four grommets that fit the Blade 230S and 250CFX exactly.
I replace mine every season as part of routine maintenance. It is a small investment that prevents the annoying problems that come from a loose canopy. If you have never thought about your grommets, buy a set and feel the difference.
Why Canopy Fit Matters for Performance
A loose canopy adds unpredictable aerodynamic drag. In fast forward flight or during aerobatics, the canopy can shift slightly, causing a trim change.
The effect is small, but it is enough to make precision hovering harder. Tight grommets lock the canopy in place so the air flows over it consistently.
The canopy also protects your electronics. A canopy that blows off in flight leaves the receiver, gyro, and servos exposed to direct airflow and potential debris strikes.
The grommets are the only thing holding that protection in place. Do not underestimate them.
Installation and Maintenance
The grommets push onto the canopy mounting posts with finger pressure. No tools needed.
I recommend replacing all four at once rather than mixing old and new. Old grommets have a different grip strength, which can cause uneven tension and a slightly crooked canopy fit.
Check the grommets monthly by wiggling the canopy. If it moves more than a millimeter, replace the grommets.
Also check them after flying in high heat. Hot weather can soften rubber temporarily, and repeated heat cycles accelerate aging. A fresh set of grommets costs less than a replacement canopy.
How to Choose the Best Microheli Upgrade Parts?
Buying upgrades can feel overwhelming when every part promises better performance. Over the years, I have developed a simple framework for deciding what to buy next.
Start with the parts that break most often, then move to performance upgrades as your skills grow. This approach saves money and keeps your helicopter in the air longer.
Compatibility is the most important factor. Microheli clearly labels which helicopter models each part fits, but double-check before ordering.
A part made for the Blade 230S may not fit the 250CFX even though they look similar. If you are unsure, check the Microheli part number against your helicopter manual.
Spending two minutes on research saves two weeks of waiting for a return. Material choice matters.
CNC aluminum offers a great balance of strength and weight for most parts. Carbon fiber is lighter and stiffer but more brittle.
Hardened steel is best for shafts and high-stress components. For beginners, I recommend aluminum and steel upgrades over carbon fiber because they survive crashes better.
If you are new to the hobby, our guide to RC helicopters for beginners under $200 covers stock options that pair well with these gradual upgrades.
Consider your budget in tiers. Under 15 dollars gets you maintenance parts like linkages and grommets.
The 15 to 30 dollar range covers single-component upgrades like tail booms and tail blades. Over 30 dollars enters the performance zone with swashplates, landing gear, and complete packages.
The Power Package sits at the top end but replaces multiple parts in one purchase. I suggest starting with one or two mid-range upgrades before committing to a full package.
Installation difficulty is another factor. Tail booms and landing gear are beginner-friendly. Swashplates and feathering shafts require more patience.
If you are not comfortable working with small parts, consider having an experienced builder help with the first install. Over time, you will gain the confidence to tackle any upgrade.
For advanced setups, pairing your helicopter with high-torque RC servos and RC servo programmers and centering tools can take performance to the next level.
Frequently Asked Questions
What are the best upgrades for Blade Nano?
The best upgrades for the Blade Nano include a CNC aluminum swashplate with anti-rotation guide, a carbon fiber frame, a titanium main shaft, and upgraded landing gear. The swashplate is widely considered the most important first upgrade because it improves stability and control precision. Triple blade conversion sets are also popular for added stability and a scale appearance.
Should I get OEM replacements or upgrade parts?
OEM replacements are cheaper and simpler for basic repairs. Upgrade parts offer better durability, improved materials like CNC aluminum and carbon fiber, and noticeable performance gains. If you fly aggressively or plan to progress into 3D flying, upgrade parts are worth the extra cost. For casual hovering and basic flight, OEM replacements work fine.
Are carbon fiber frames worth it?
Carbon fiber frames reduce weight and improve stiffness, which helps with flight responsiveness and center of gravity balance. They are worth the investment for intermediate and advanced pilots who want better performance. However, carbon fiber is more brittle than plastic in crashes, so beginners may find aluminum frames more forgiving and cost-effective.
What is a 3-blade conversion set?
A 3-blade conversion set replaces the standard two-blade main rotor or tail rotor with a three-blade design. This improves stability, adds a scale appearance, and can increase lift efficiency. Installation requires a new rotor hub, blade grips, and sometimes a longer main shaft. Compatibility varies by helicopter model, so check fitment before purchasing.
Do upgrade parts improve flight performance?
Yes, quality upgrade parts improve flight performance by reducing weight, increasing strength, and eliminating mechanical slop. CNC swashplates provide tighter pitch control, carbon fiber frames improve rigidity, and hardened steel shafts resist bending. These improvements add up to better stability, sharper response, and more predictable behavior during advanced maneuvers.
Final Thoughts
The best Microheli upgrade parts deliver real improvements you can feel in the air. After testing ten options across multiple Blade helicopters, I recommend starting with the CNC Power Package if you want a complete transformation.
The Aluminum Swashplate is a great choice for Nano owners, and the Carbon Fiber Folding Tail Blade offers excellent crash protection. Each serves a different need, but all share the same quality and precision that Microheli is known for.
Build your upgrade path based on your skill level and flying style. Beginners should focus on durability parts like landing gear and tail booms.
Intermediate pilots will benefit from swashplates and feathering shafts. Advanced builders can go all-in with performance packages and triple blade conversions.
No matter where you are in your RC journey, the right upgrades make every flight more enjoyable. If you are ready to move up to larger models, check out our picks for the best 500-size RC helicopter kits to plan your next build.
Happy flying in 2026, and may your landings be soft.